
9 Visualizing Microbes 9/16-9/22
Procedure
Performing a Gram Stain
- Label the microscope slide
- Detach pipette tip box lid or use self-provided tupperware/ container to use for catching extra dyes
- Add sample to the glass microscope slide (choose one of the following):
- Cheek Swab: Drag swab across cheek. Add small drop of water to a glass slide and use swab to make a small smear of cells across the slide. (It might not be visible) Follow video tutorial above to see how to take a cheek sample and mount it onto a slide.
- Bacterial culture: Take a loopful from one of your liquid bacterial cultures and make a small smear across your glass slide.
- Allow the suspension to AIR DRY COMPLETELY.
- Fixation of the cells: add 100 μl of ethanol (decolorized) to your slide on top of the dried smear and fix cells to slide for 30-60 seconds. Let run off and continue with the next step.
- Primary Stain – Crystal Violet: Using the P200 pipette (with a pipette tip, draw up 100 μl of CV and gently add to fixed sample and spread liquid over the entire sample area. Let CV sit for 1 minute on slide.
- Mordant – Gram’s Iodine: Using a transfer pipette, draw up 0.1mL of iodine (first notch of pipette) and gently add to the slide and mix with CV. Let iodine stand for 1 minute on slide
- Decolorization – 95% EtOH: Pick up microscope slide with clothespin. Using your P1000 pipette (and tip), draw up 0.5 mL of decolorizer, use more if needed. Tilt the slide into upturned box lid and add decolorizer DROP BY DROP until run-off is completely clear.
- Rise gently with a stream of water for 2-3 seconds, using a transfer plastic pipette.
- Counter Stain – Safranin: Using your P200 pipette, draw up 0.2 mL of safranin (first notch of pipette) and gently add to the slide and let stand for 30-60 seconds.
- Rise gently with water for 2-3 seconds
- Blot (DO NOT RUB) the smear dry with bibulous paper (put the slide between the sheets and tap gently).
- View your gram stain slide under the microscope. Reference back to the “Art of Microscopy & Life in a Drop of Water” module for tutorials about viewing slides and using your microscope.
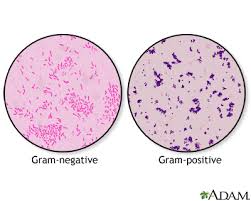
In this chapter, I learned how to perform a gram stain. The Gram stain is a method to classify bacteria based on their cell wall structure. It involves staining with crystal violet, fixing the dye with iodine, decolorizing with alcohol or acetone (which removes the dye from Gram-negative bacteria), and counterstaining with safranin to color Gram-negative bacteria pink while Gram-positive bacteria remain purple due to their thick peptidoglycan layer. Gram-negative bacteria, with a thinner peptidoglycan layer and an outer membrane, lose the initial dye during decolorization. Not all bacteria fit neatly into these categories, as some have unique cell walls (e.g., Mycobacterium) or lack walls entirely (e.g., Mycoplasma). Microscopic observation distinguishes Gram-positive (purple) from Gram-negative (pink) bacteria.
The stain test, particularly the Gram stain, is crucial for identifying bacteria by distinguishing them as Gram-positive or Gram-negative based on their cell wall structure. This differentiation helps guide antibiotic treatment, as the two groups respond differently to medications like penicillin. It also aids in diagnosing bacterial infections, understanding bacterial morphology and behavior, and tracking outbreaks in public health. In research, stain tests serve as a foundation for studying bacterial properties and identifying unknown species, ensuring timely and precise interventions in clinical and laboratory settings.