
Technology for Teaching & Learning
48 Blogger
Jennifer Smith
If you are looking for an organized and aesthetically pleasing way for your students to present artifacts that demonstrate learning, a blog may be your solution. For a summary of the pros and cons of teaching with blogs, visit the Vanderbilt University Center for Teaching.
Using Blogger for Your Classes | Create the Blog | Choose a Theme | Add to Canvas Navigation | Student Instructions
Using Blogger for Your Classes
I have used Blogger to provide a visual forum for displaying images, comments, and sharing for in-class discussion. Blogger can be linked within Canvas by using the “redirect” tool. This application of Blogger was developed by Patrick Grisby who teaches in the School of Art & Art History. Here is what Professor Grisby says about using Blogger for his classes:
Each student is invited to the space to join and membership permits commenting. The entire blog can be made private, but I make the settings public for viewing, but membership required to contribute. It is easy to use, but takes some instruction and acculturation of use (there is a lesson in the sketchbook course that requires learning the tool through photographs of century tower for the on campus version of the course). Muscle memory then makes it common practice to upload photos of analog drawings in the sketchbook.
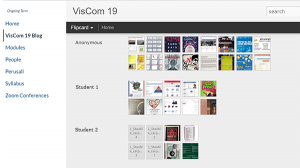
View an example of a “Flipcard” blog site: Visual Communication 2021
Issues
Blogger is a free tool that has been taken over by Google. It appears that they have recently begun to update the service, so functionality may improve. Blogger can be a good choice to display visual content, but I think it would be too cumbersome to manage if you have a large class.
Blogger has been approved by UF Privacy and Security for use with non-restricted data. So it is important to remind your students to keep personal information off of the site. Access requires a Google account. Unfortunately, your UF Google account will not allow you to access Blogger. So both you and your students will need a non-UF account. It is a good idea to make your blog “Private – Only blog authors.”
You can set up the blog to display within Canvas, but students cannot edit or create posts from within Canvas (there may be a setting that allows this, but I haven’t found it yet.)
Create the Blog
Blogger’s “Help Center” has pretty good step-by-step directions on how to set up the blog. The “Themes” make it easy to create something that looks good and has the functionality that you need.
You will need to give students author access if you want them to be able to upload images and write posts. There is a limit of 100 members (that includes authors, administrators, and readers). You can export student emails from Canvas and send the invitation to their official UF address. They will be prompted to use an existing Google account or create a new one. Remind them NOT to use their UF credentials for this account.
Choose a Theme
It is a good idea to create a couple of sample posts with the type of content that you will want your students to submit. Then you can apply the different themes to see what works best. I found that the “Flipcard” view provides a flexible way of organizing submissions. This is the view that Patrick Grisby uses for his art classes.
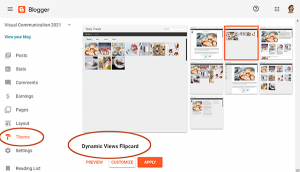
- Choose “Theme” from the left menu
- Scroll down to “Dynamic Views”
- Choose “Flipcard”
- Click the “Apply” button (or click “Preview” first to make sure it works with your content)
Add to Canvas Navigation
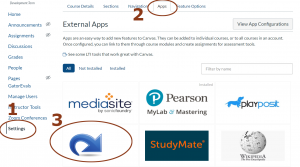
Use the Canvas “redirect” tool to add a link to your blog in your Canvas navigation. This tool is handy for linking to any external resource that you want to have easily available for your students.
- First, enable the redirect tool by adding the app
- Go to “Settings” in the left menu
- Choose “Apps” and choose “All”
- The “redirect” tool is a large curved arrow
- Click the “+Add App” button
- In the text box that opens:
- Replace the text in the “Name” box with your link text
- Enter the URL
- Choose “Add app”
You may need to refresh the page to see your link appear in the navigation.
Student Instructions
Blogger setup seems to have an awful lot of steps, but once you have created the blog and have it working in Canvas, it is pretty easy for students to create posts. Students can even create posts using their phones. It is a good idea to create a low-points assignment that walks them through the account setup and their first submission. Download and customize these Blogger instructions to meet your needs.
Direct students to apply a “label” with the specific assignment to each post. Be aware that students will frequently forget to do this, however, as the administrator, you can apply the appropriate label. With the “Flipcard” view you will be able to sort by recent, date, label, or author.
You can set up your blog to allow posts by members. In my class, we discussed the posts in a synchronous class session, so we did not use that feature. You could also direct students to put the link to their post into a Canvas discussion board and for peers to post comments there. That would help to keep critique and feedback in a UF-approved location. You could also attach the points for the assignment in a rubric associated with the discussion board to make grading easier.
