
Preparing to Teach
10 Course Planning
Rhiannon Pollard
University of Florida School of Forest Resources & Conservation
Course Design Basics
Instructional design theories abound! Here are a few tried-and-true standards that will help you orient yourself to the process of creating a course.
Backward Design
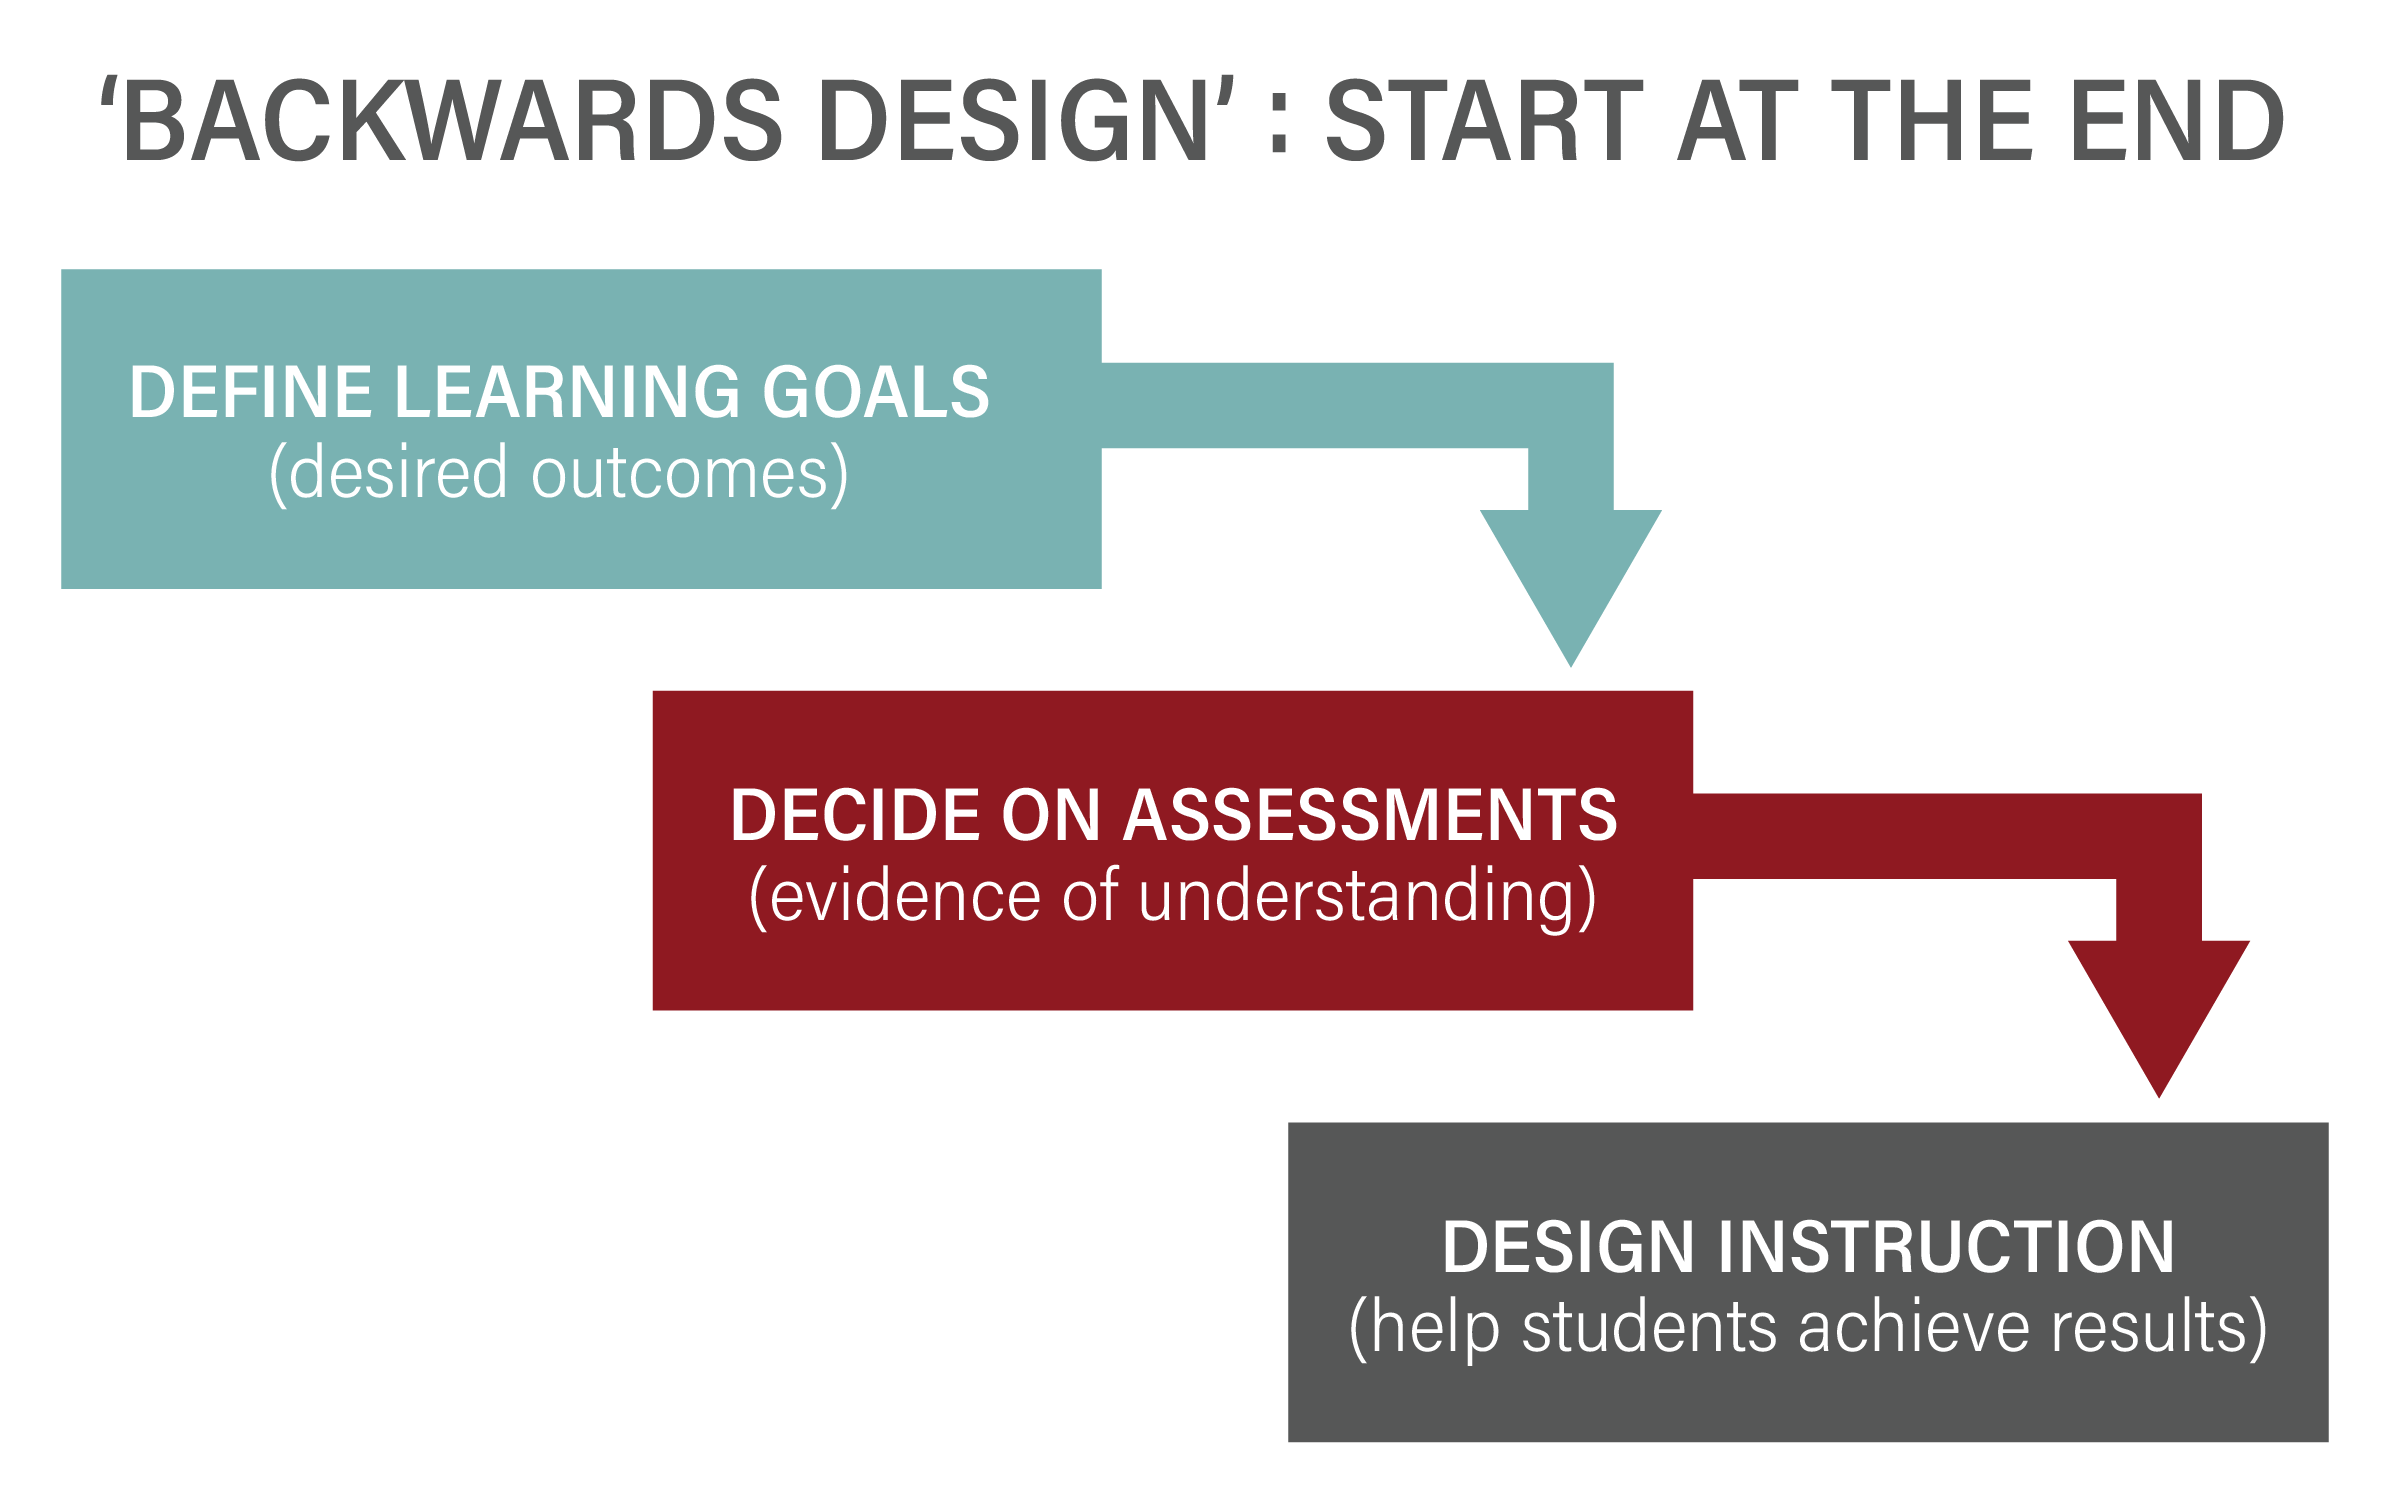
Backward design refers to the process of determining what you want your students to be able to do at the end of the course before you design your content and plan your delivery.
In other words:
- What are they supposed to learn?
- How will you know they learned it?
- How will you help them learn it?
The question of “what will you teach?” is not the point of the process, because the focus of the course is on what and how the students are learning to do – not what you are teaching. Backward design makes designing your courses easier, in fact, because the outcomes will already be there to inform your decisions on both content and delivery methods.
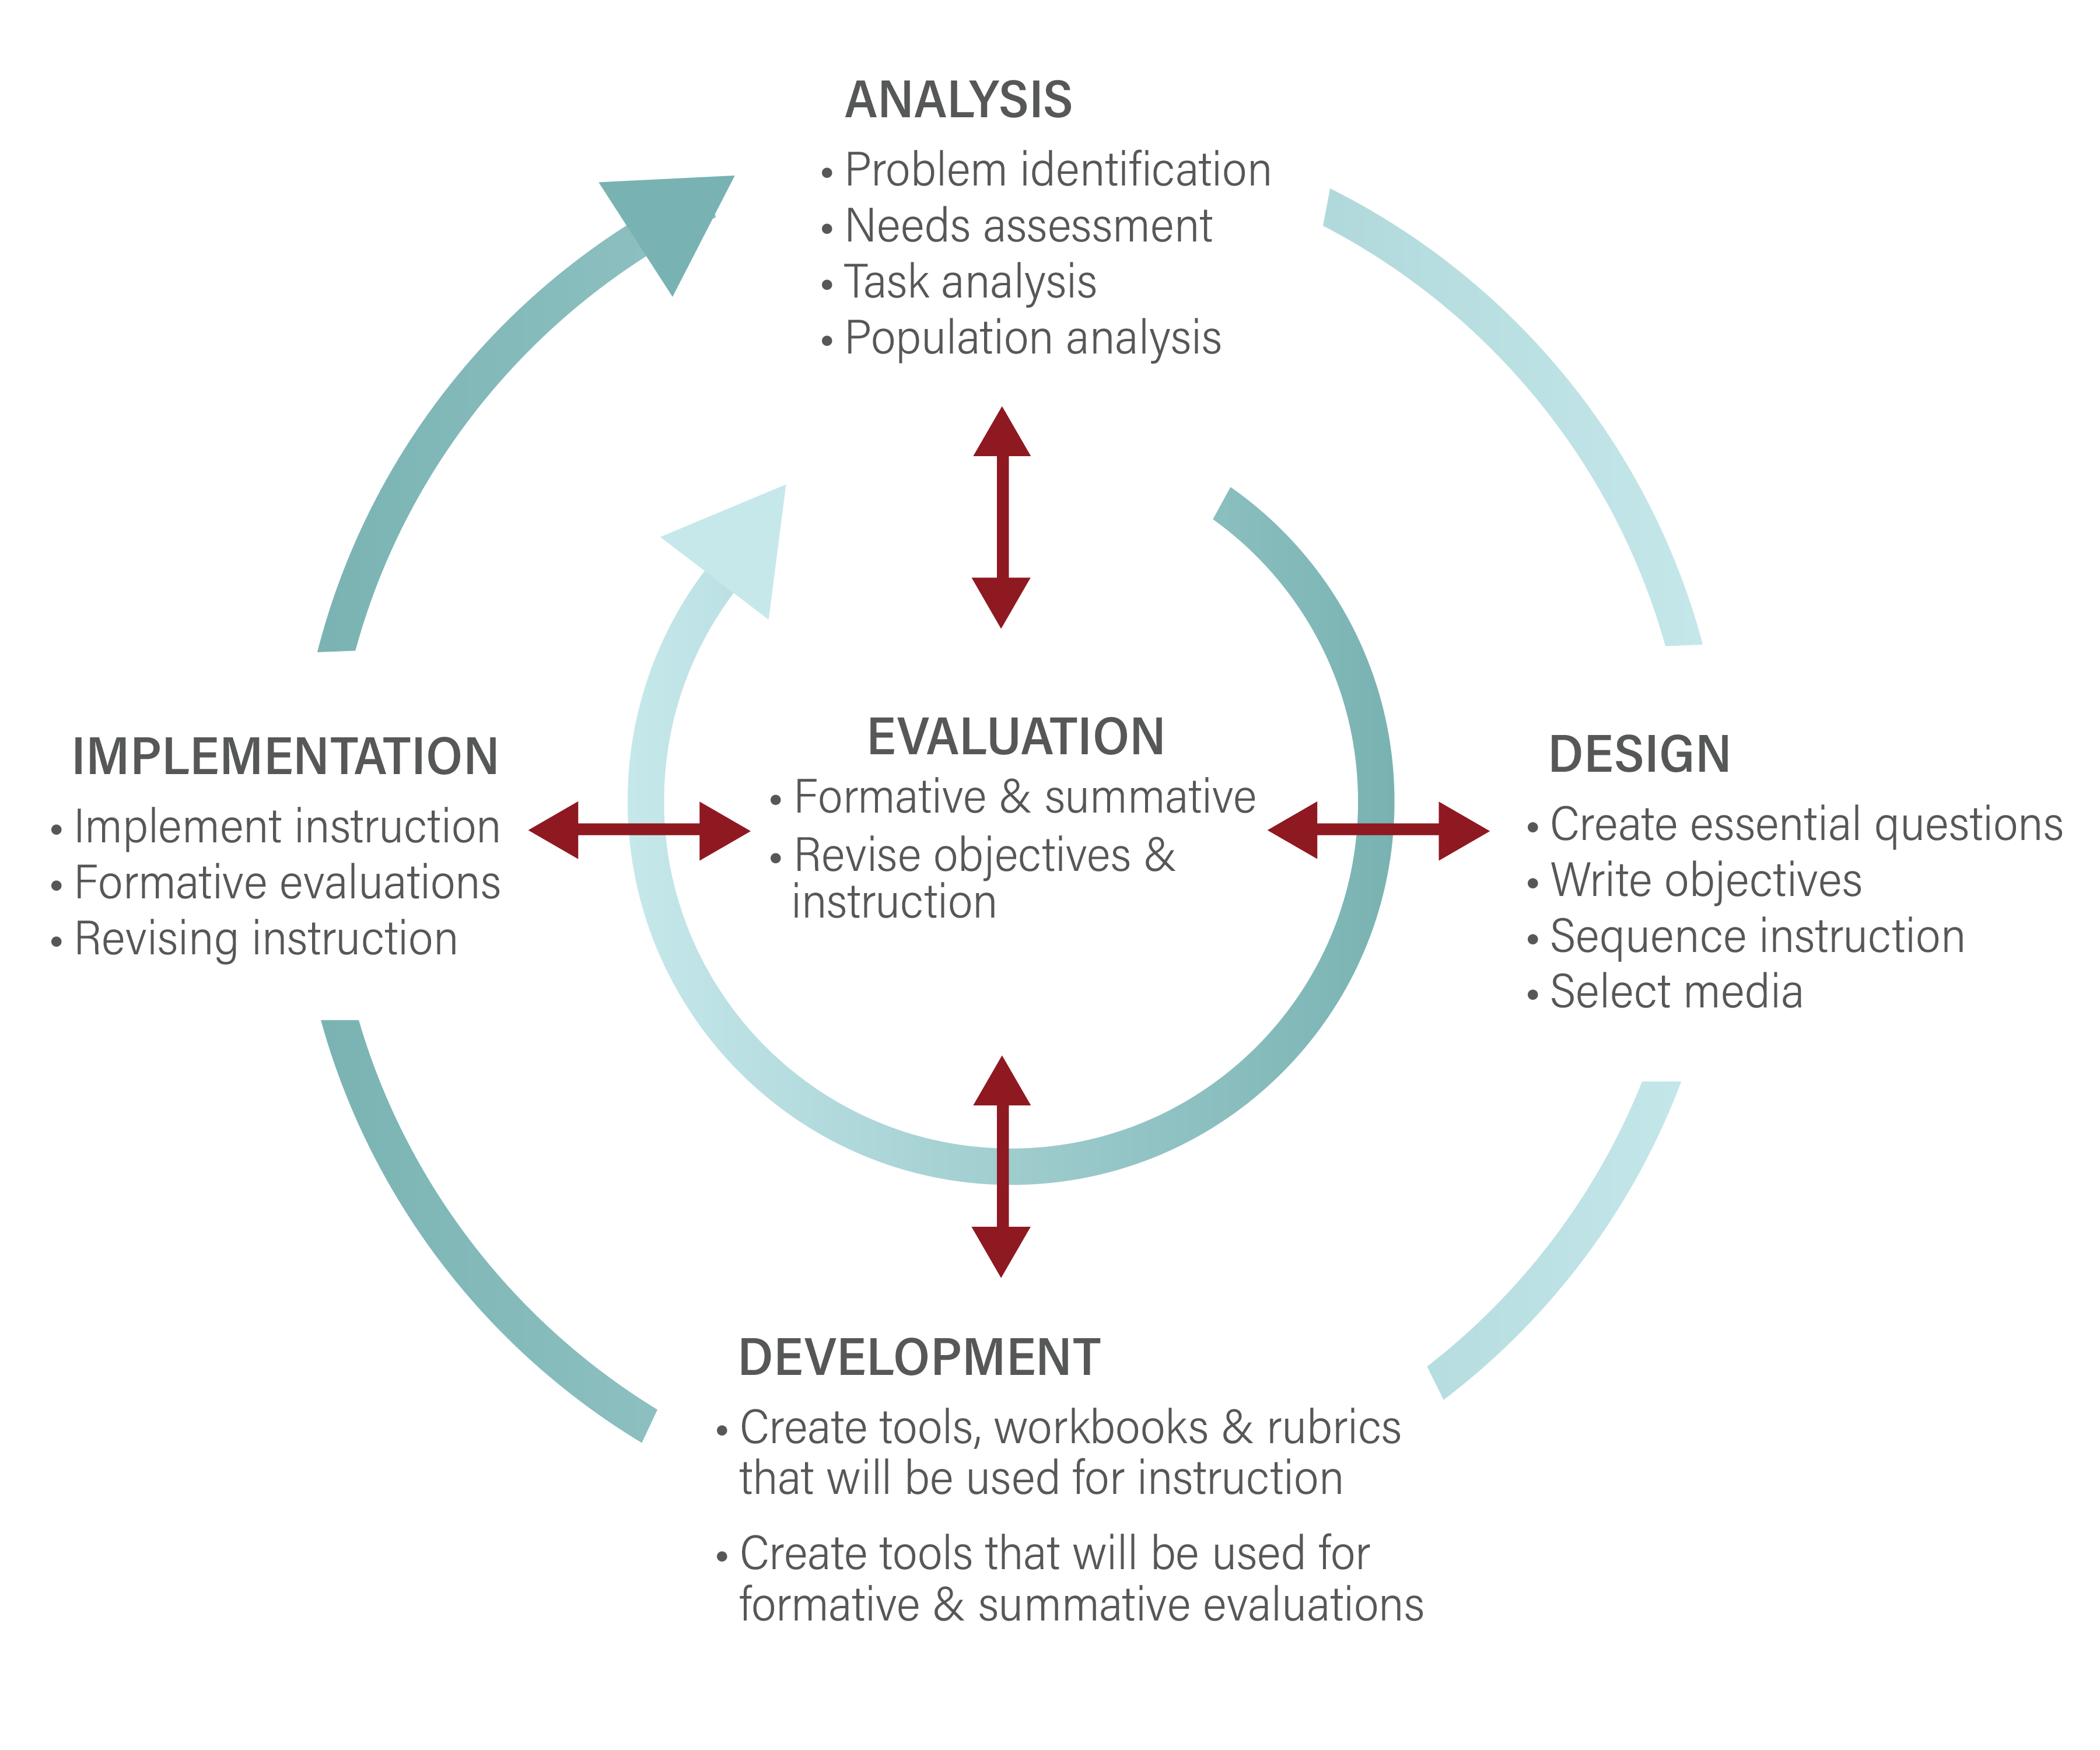
ADDIE (Analyze, Design Develop, Implement, Evaluate)
“ADDIE” is one of the most commonly used instructional design theories which is in-depth and in which each step provides an outcome that informs the next step. ADDIE provides an ongoing opportunity to assess and revise your teaching across course offerings.
Always start with your course’s student learning objectives. Then, drill down and develop objectives for each module or topic. When it’s time to decide how you will help your students learn the material, you can refer to the Learning Activities or Resources sections.
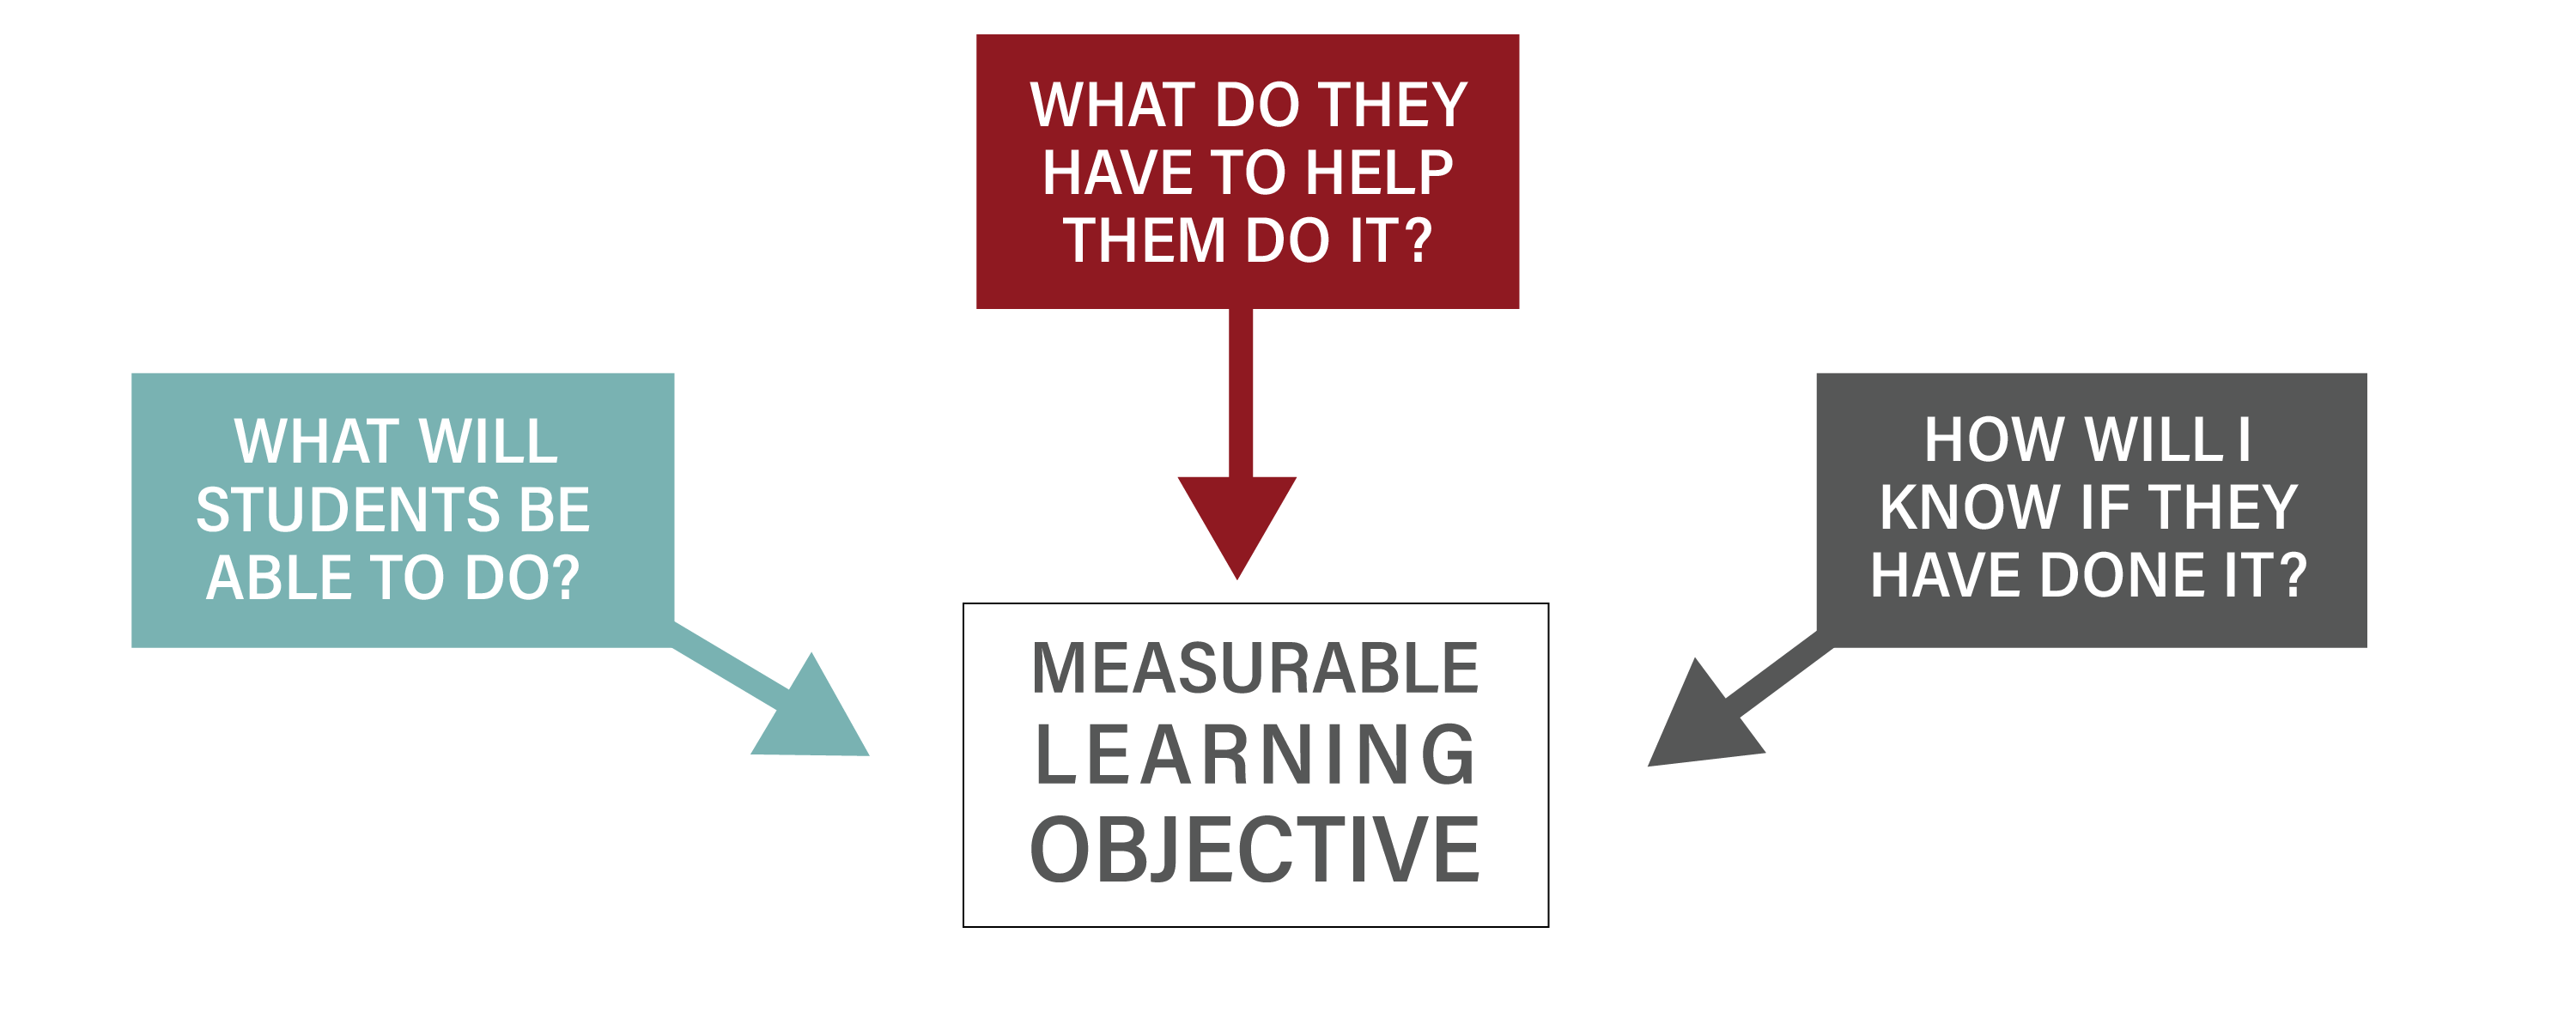
Writing Good Objectives
A learning objective is much more specific than a goal. According to Mager (1962), the ideal learning objective has 3 parts:
- A measurable verb (behavior)
- The important condition (if any) under which the performance is to occur and
- The criterion of acceptable performance.
If the conditions are obvious, they may or may not be stated. However, sometimes the adding the condition(s) and/or the criterion adds clarity to a learning objective.
What Not to Do…
“Students will understand the hydrologic cycle.”
⇒ This fails to address how students will demonstrate learning. It is neither specific nor measurable in terms of the outcome.
Better…
“After completing this lesson, the student will be able to evaluate a natural resource policy in terms of its impact on water quality.”
“Given a set of statistical data, the student will be able to predict the effects of variables x, y, z relative to fish populations in the Gulf of Mexico.”
⇒ Students know what they will be able to do, and you have a clear next step for creating your assessment of this objective.
Always keep in mind that the objectives, and what the students are able to do, will need to be directly assessed – so if you say a student “learned” something, how are you going to assess that?
If the objective is, for example, that the student can analyze a water quality sample, you can assess that by having them describe the steps required to do so.
Using Bloom’s Taxonomy to Write Better Objectives
Benjamin Bloom (1956) described a way to classify instructional activities as they progress in difficulty.
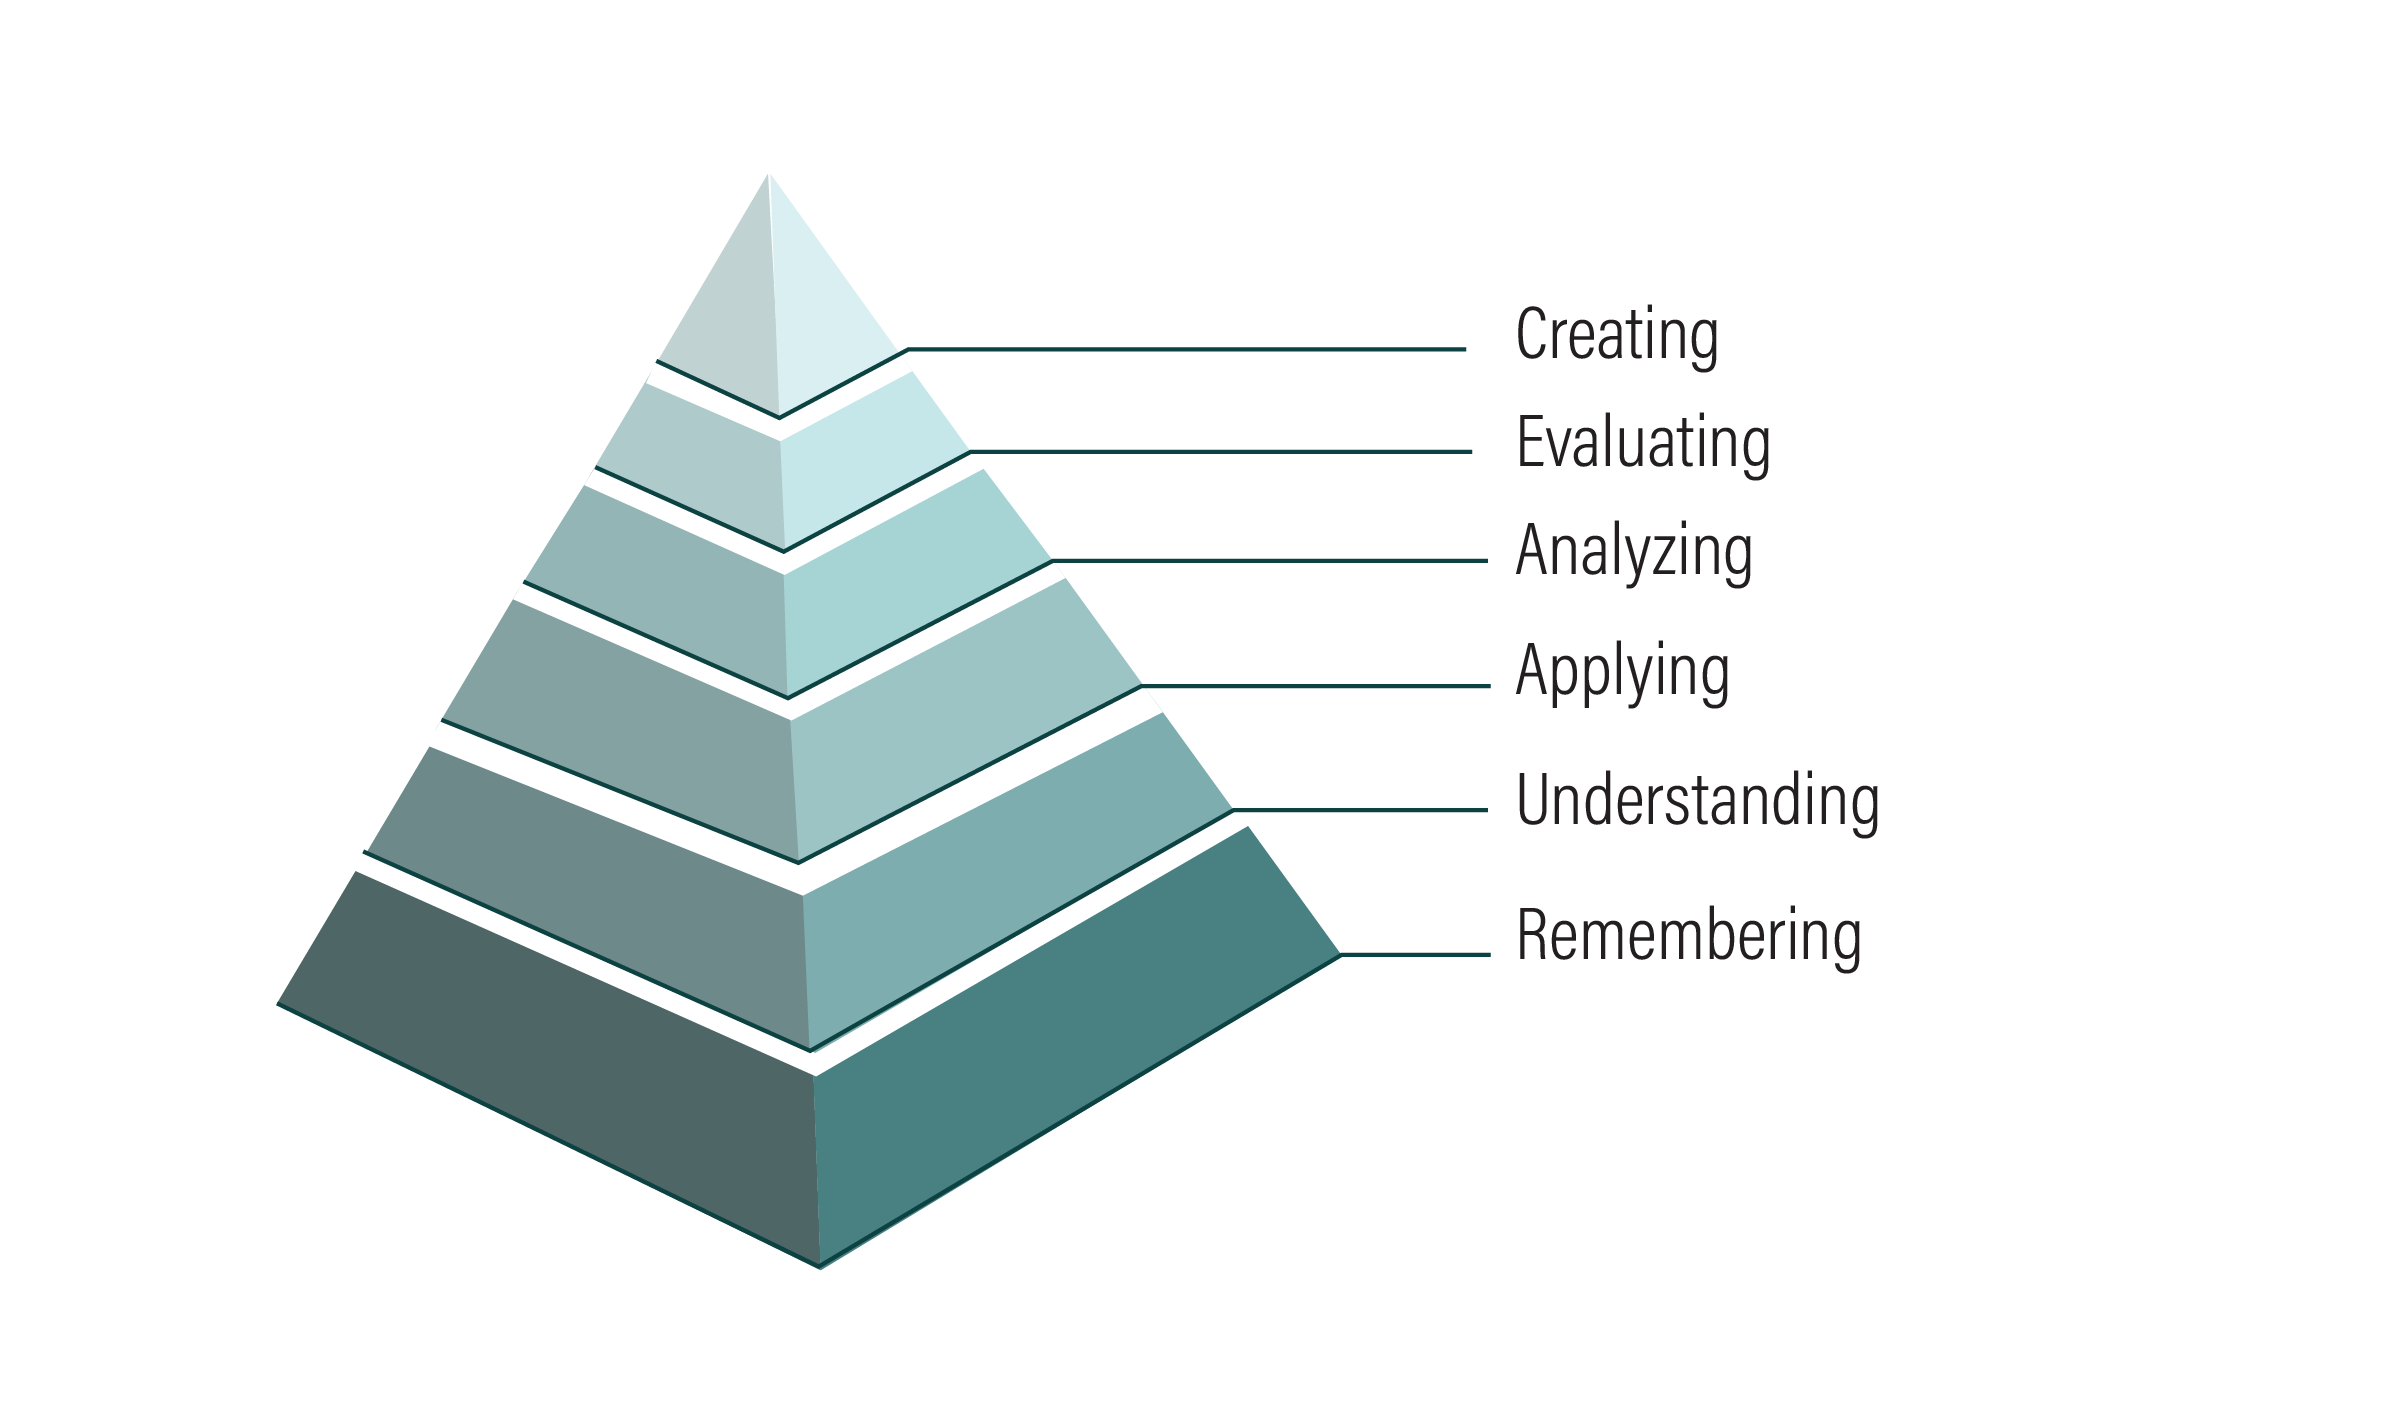
At the undergraduate 4000-level, we want to be at least “applying” and “analyzing” some of the time; if all objectives are simply “explain” or “describe” verbs, we should be questioning the rigor of the instruction.
Graduate courses should focus on analysis, synthesis, and evaluation as much as possible.
Helpful Verbs for Objectives and Where They Fit into Bloom’s Taxonomy
Bloom's Taxonomy Verbs
| Creation | |||||
| Design | |||||
| Evaluation | Plan | ||||
| Judge | Compose | ||||
| Analysis | Appraise | Propose | |||
| Compare | Estimate | Formulate | |||
| Application | Distinguish | Evaluate | Arrange | ||
| Use | Differentiate | Revise | Assemble | ||
| Comprehension | Employ | Diagram | Score | Collect | |
| Express | Interpret | Analyze | Select | Construct | |
| Knowledge | Restate | Dramatize | Categorize | Rate | Create |
| Define | Identify | Sketch | Appraise | Choose | Setup |
| Repeat | Explain | Practice | Experiment | Measure | Organize |
| Name | Recognize | Illustrate | Test | Compare | Prepare |
| Recall | Discuss | Operate | Contrast | Value | Manage |
| List | Describe | Demonstrate | Inspect | Assess | Predict |
| Relate | Tell | Apply | Debate | ||
| Record | Locate | Schedule | Inventory | ||
| Underline | Report | Show | Question | ||
| Outline | Review | Translate | Examine | ||
| Delineate | Summarize | Solve | Criticize | ||
| Specify | Sketch | Relate | |||
| State | Solve | ||||
| Label | Calculate | ||||
| Match | Critique | ||||
| Avoid the word "understand!" | Classify |
Active Learning
What and Why?
While the lecture is important for the dissemination of information, research shows that students need to be involved in order to remember information, concepts, and skills—the most sophisticated level of really knowing is the ability to teach someone else that same skill. Above all, they need to learn that they can and should take ownership of their learning.
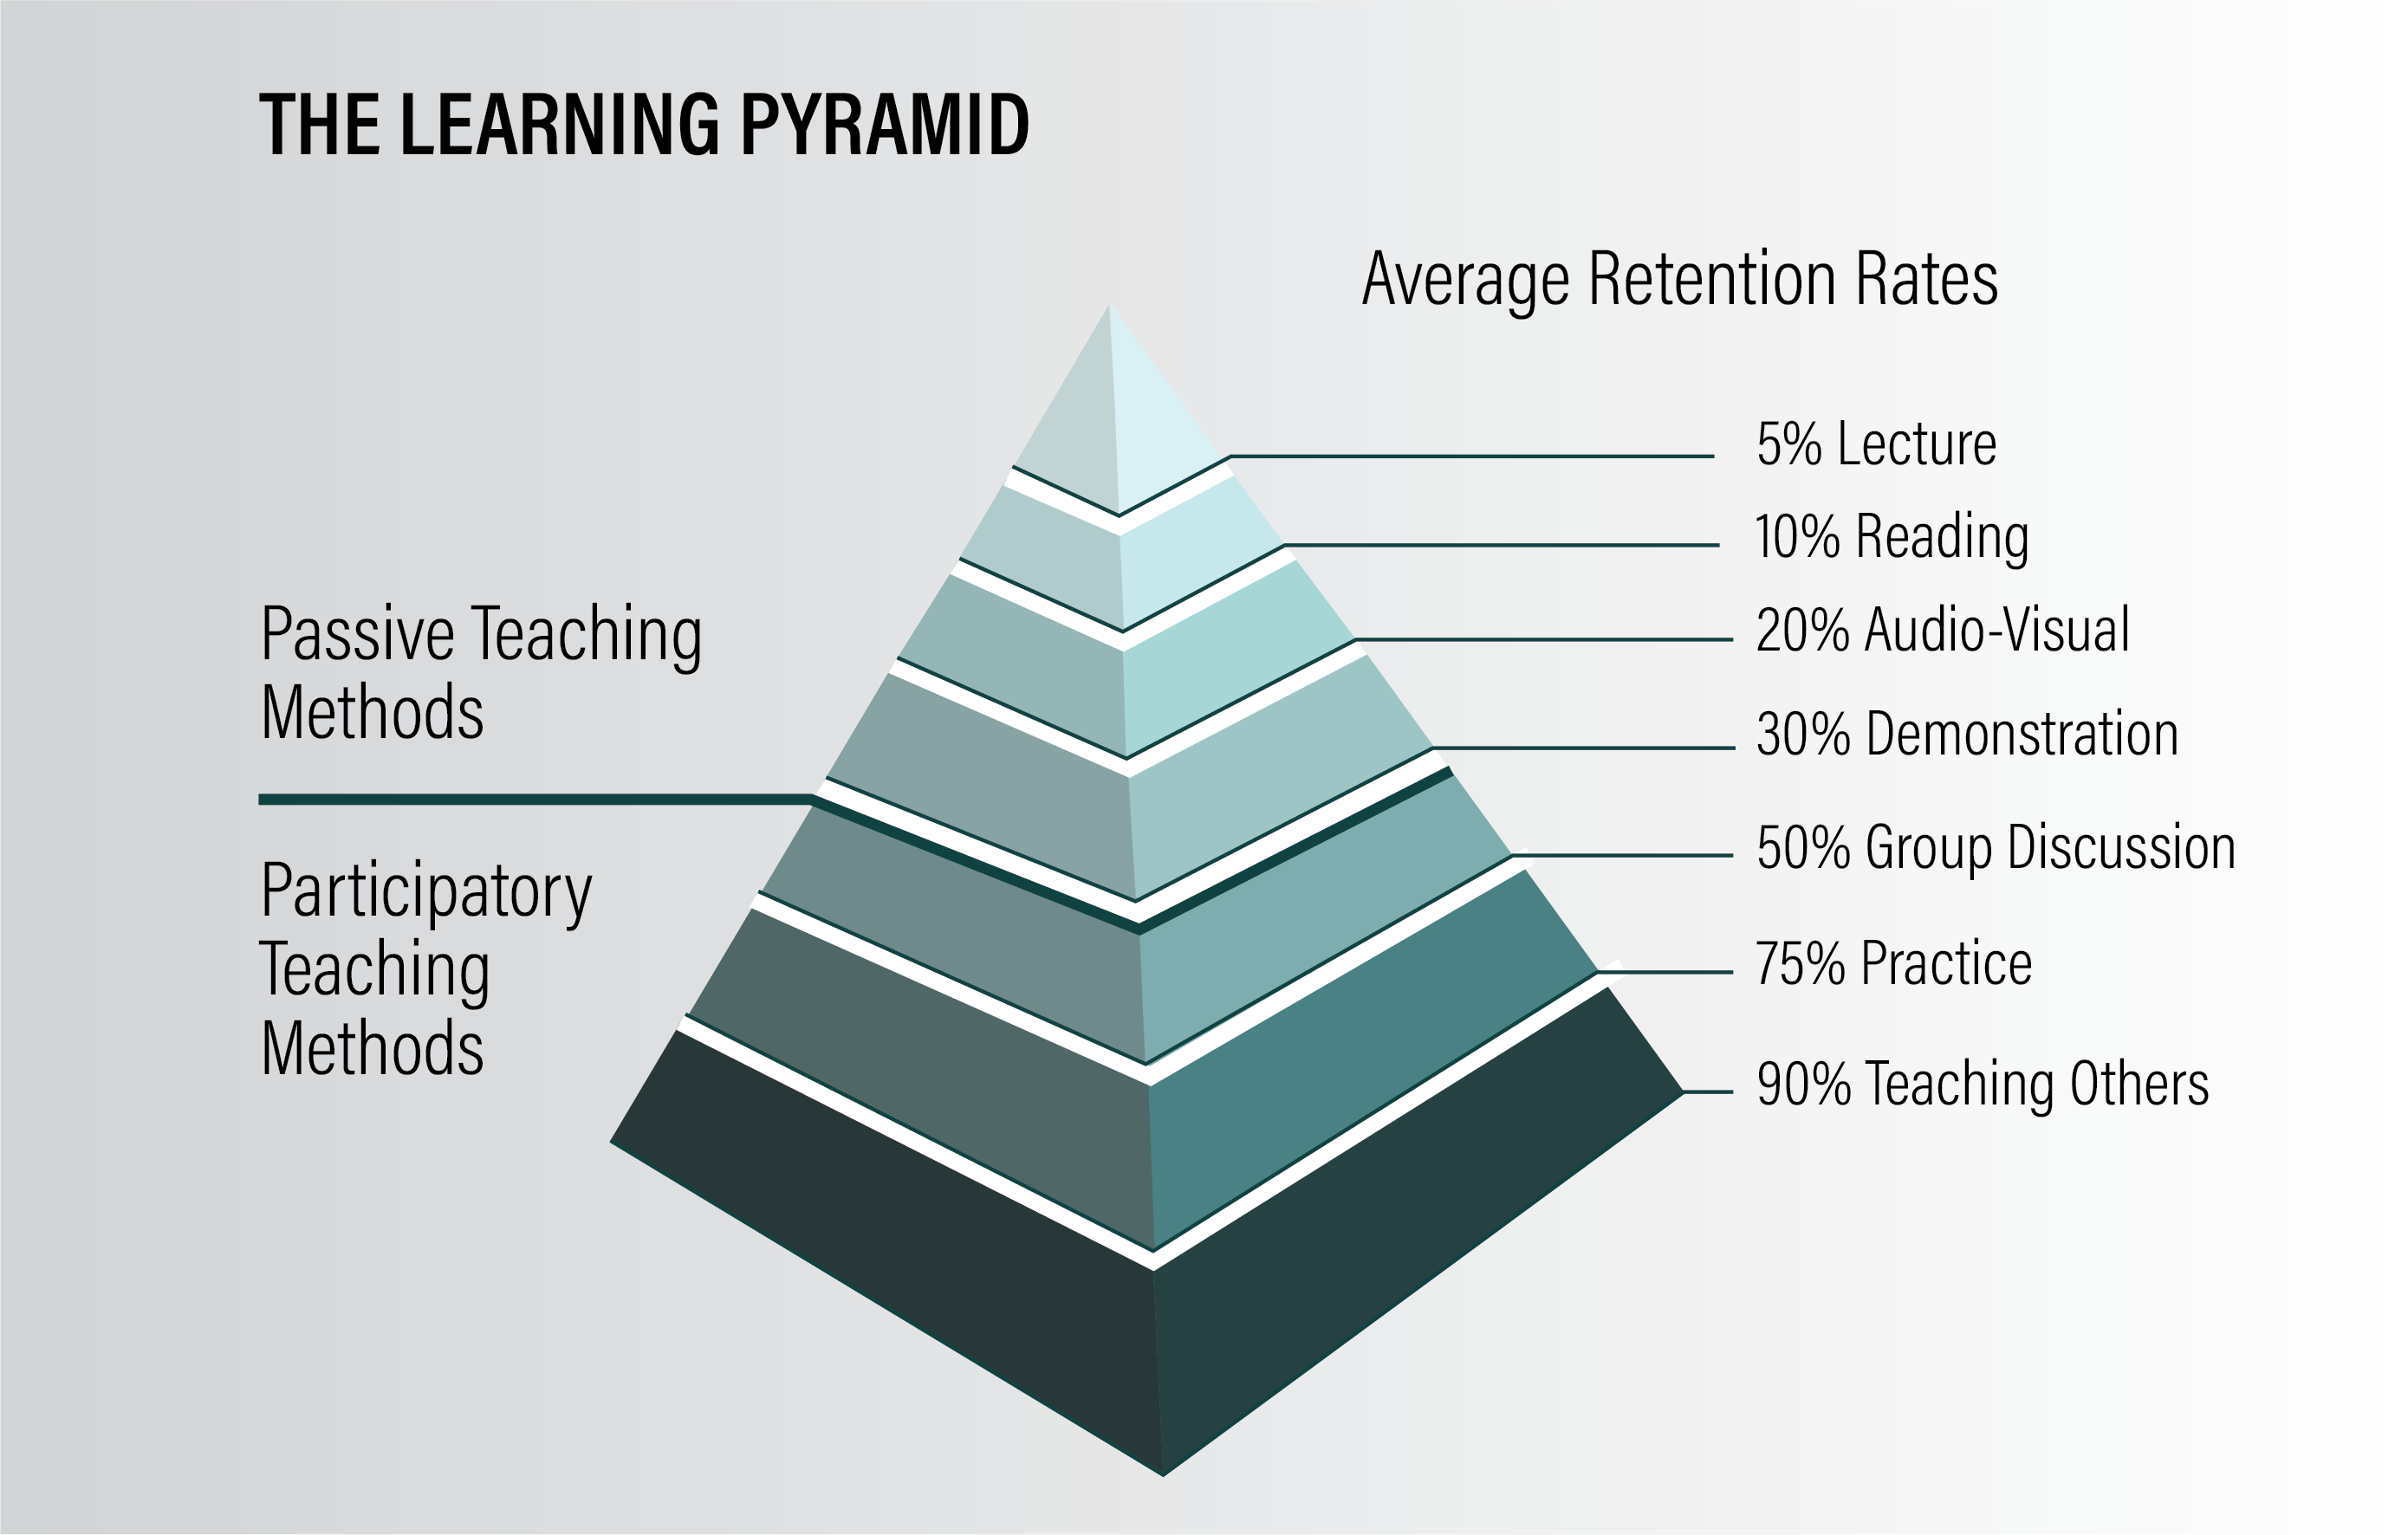
Longitudinal studies show that cohorts of students instructed using active learning techniques outperformed a comparison group on multiple measures: retention, graduation, and pursuit of graduate study. (Felder, Felder, & Dietz, 1998)
Active Learning Allows Students to:
- observe and “discover” something,
- construct concepts from their own observations,
- analyze data as though their interpretations and conclusions lead to real-world consequences.
How can you get students to take ownership of their learning? Give them a variety of activities, encourage self-assessment and reflective study, include group work, discussion, student presentations, and case studies. Anytime you ask the student to apply what they know, they are learning actively. Engagement (through two-way communication) is key to active learning.
Guidelines for Good Lectures
A good lecturer presents the audience with opportunities for meaningful engagement with the subject material and with the lecturer. Frame your lecture plans using these questions:
- What do you want the audience to learn?
- What are the key concepts that need to be addressed?
- What essential skills and competencies should participants have on leaving the lecture?
- How will all this be clearly communicated to the audience?
Be Clear
- State your objectives and why the students need to know the information you are about to present.
- Keep the flow of the material logical.
- Pace the delivery so that students have a chance to take notes.
- Speak clearly and use a high-quality microphone (headset).
QUALITY OVER QUANTITY
It’s not how much is delivered but how much is understood and retained that is most important. A 1984 study by Russell et al. found that students who learned and retained the lecture information better the lower the level of new content.
After briefly presenting new ideas, the remaining time was filled by restating, reinforcing, and relating the material to the students’ prior learning.
Be Interesting
- NEVER READ YOUR TEXT FROM THE SCREEN. Visuals should illustrate and expand on your narration, not provide you with karaoke prompts!
- There are documented negative effects to reading and hearing the same information simultaneously, aka cognitive load theory.
- Provide real-world examples of the points you are making.
- Use analogies to explain new concepts in terms of familiar ones.
- Present the information stated in your objectives.
- Recap your main points and provide questions for further thinking.
- Incorporate video, audio, and images when appropriate and relevant. Save extraneous resources for post-lecture activities.
- Believe it or not, students prefer to SEE you (not just hear you)! Record yourself whenever possible, even if you have to use your phone to do it.
Remember the Context
While some lectures can be used as standalone modules, for the most part, your lectures will be framed within a course that has learning objectives and activities. Be sure every lecture has a clear relationship to the larger course objectives– if it doesn’t, why are you presenting it? Follow up with your objectives by providing an activity that displays their understanding of the content
Designing PowerPoint Presentations
The look and feel of your presentation speak volumes, and an unpolished or boring PowerPoint can damage students’ perceptions of even the best and most well-articulated content. Use these tips to improve your presentations.
#1 Design Your Own Template–or Ask For Help!
Built-in design layouts in PowerPoint are a dime-a-dozen and your students (and colleagues) have seen them all before. Even if your design is simply solid colors with no frills, that’s OK! In fact, solid colors can impart a very professional, modern impression. Try to use the same layout for all presentations in a single course. Free templates are available from Slidesgo and SlidesCarnival.
#2 Readability Matters
Be sure that your images and text do not blend together and that text colors and backgrounds contrast sufficiently. This is not just good design but part of ADA standards compliance as well. Dark backgrounds are best for visibility and focusing attention.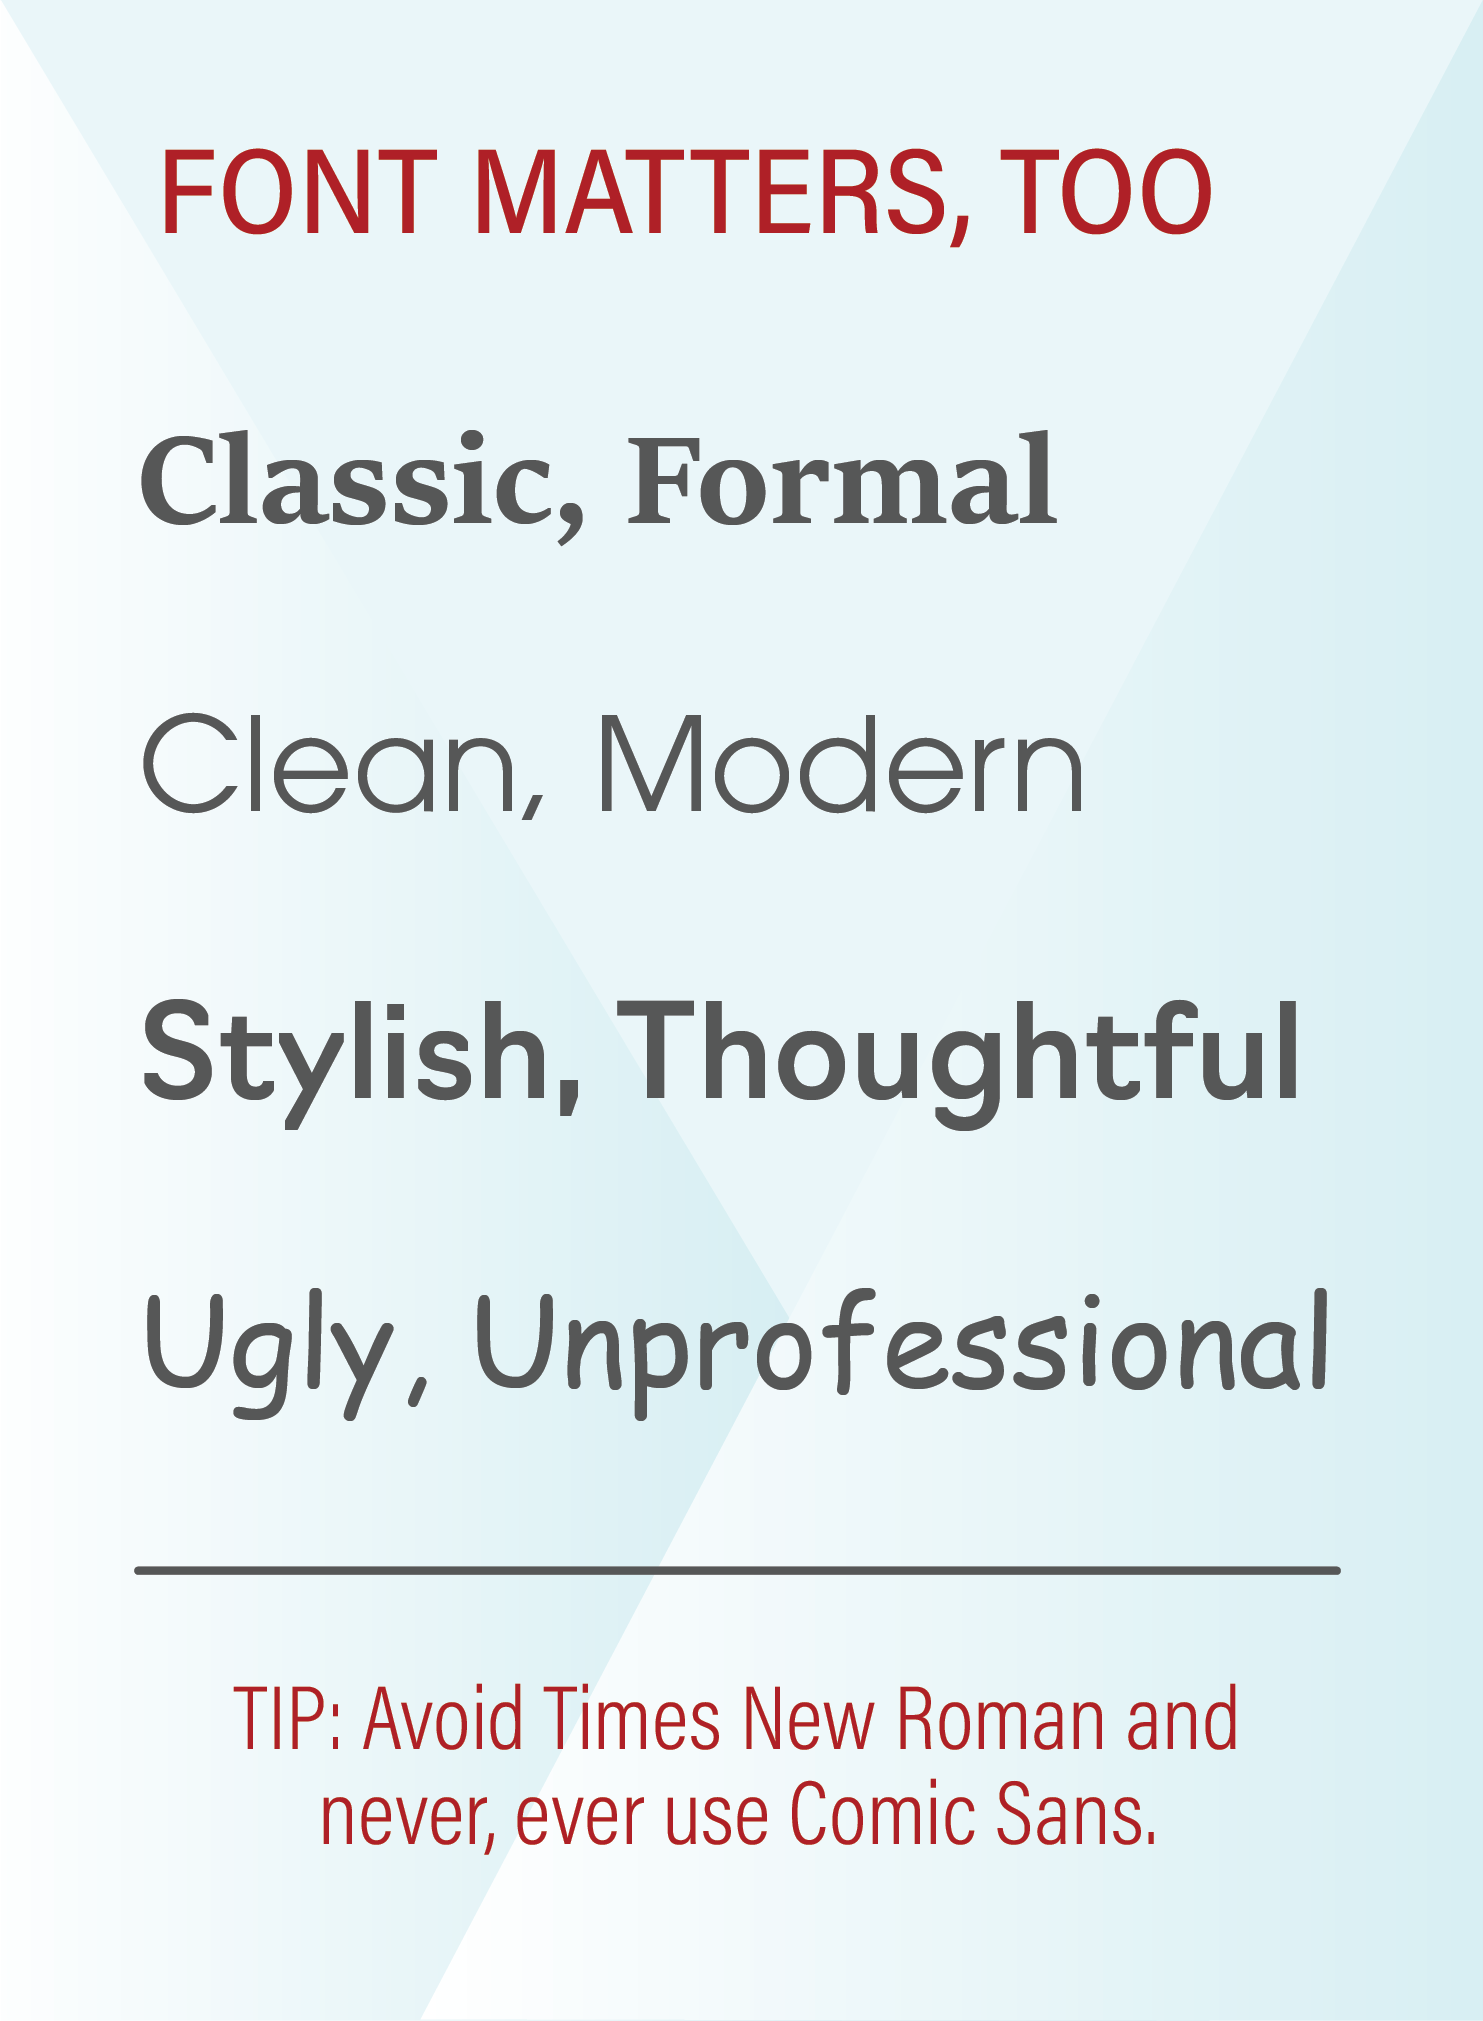
#3 Use Quality Images
A bad picture is worse than no picture at all when it comes to presentations. Go for high-impact, high-quality images which you can find for free through Flickr, Google Images, and Creative Commons searches. Remember to attribute your images when necessary.
#4 Simpler is Better
One to three ideas per slide is ideal. Visuals do have a much greater impact than text, so use them, but avoid unnecessary animations. Go for bold or italics when needed but skip drop-shadows, underlines, and other text decorations. Use contrast to your advantage and emphasize and stylize sparsely for greater impact.
#5 Don’t Overuse Text (or Bullets)
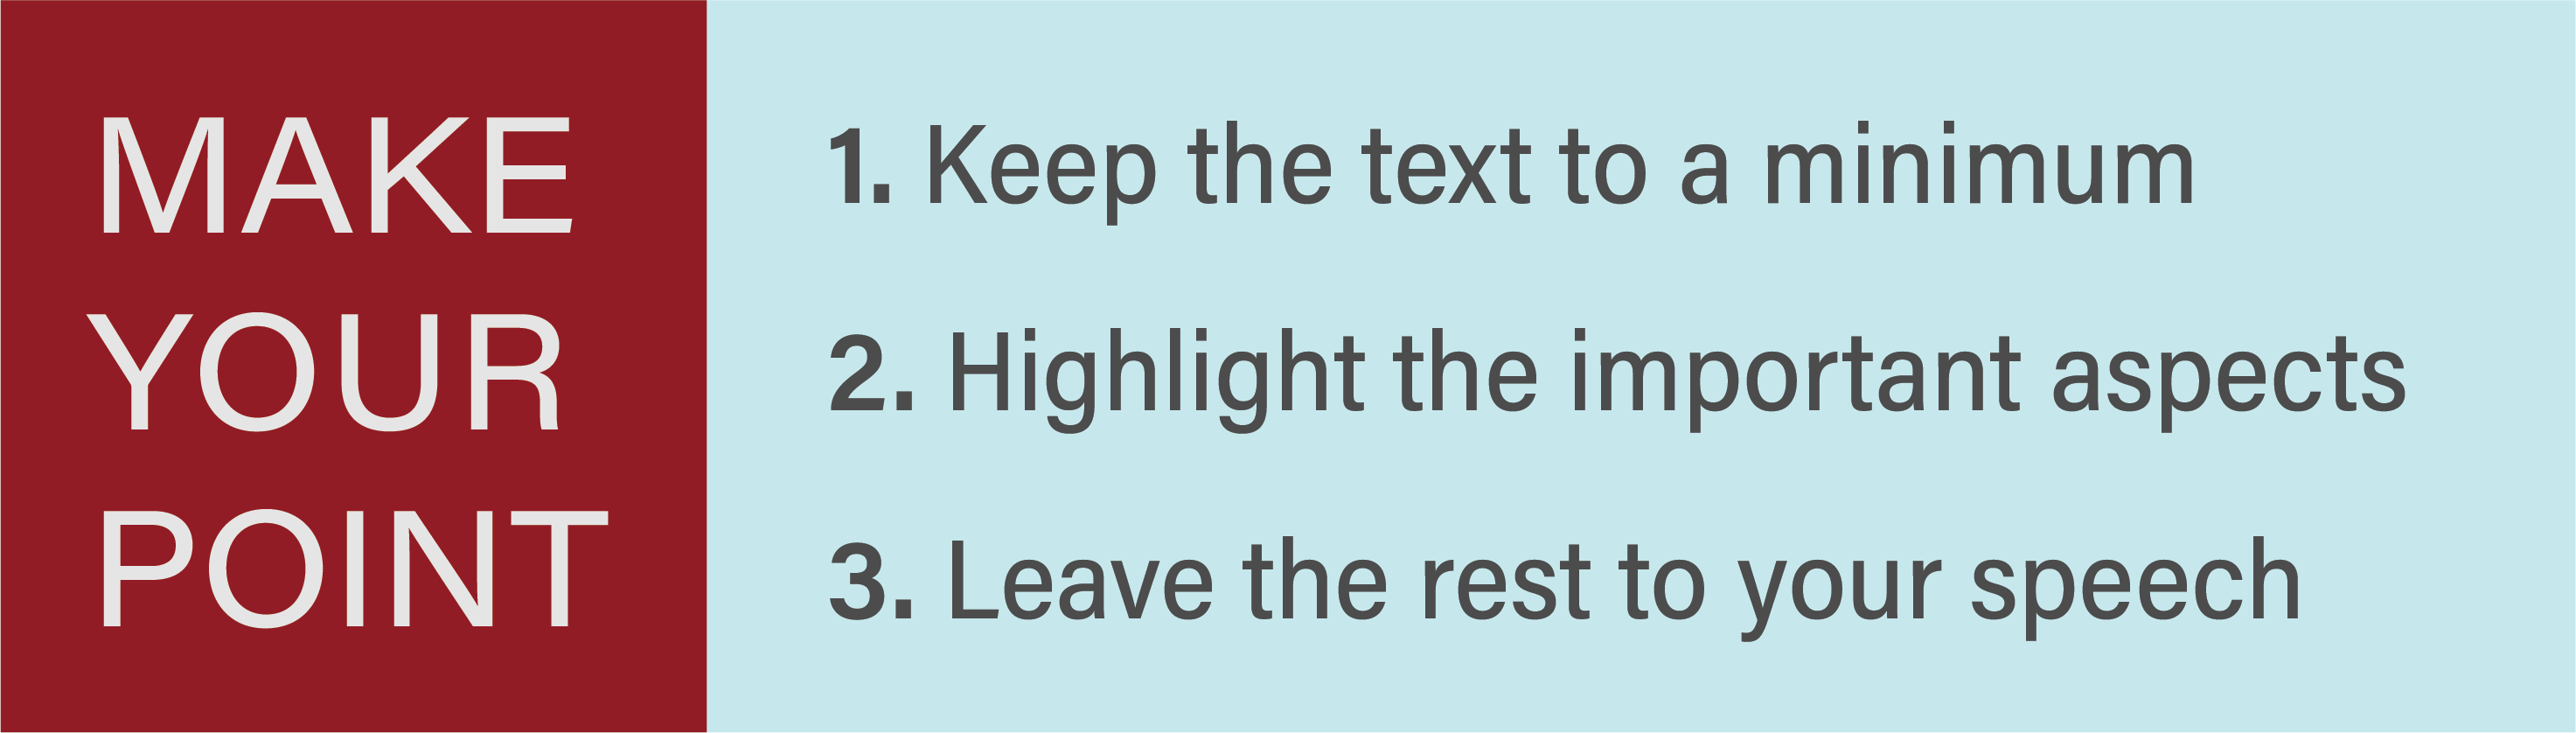
Always remember that the slide should not be the ultimate source of content and information. Your speech should be! If you are saying everything you need to say through text on the slides, what’s the point of presenting it?
For more help with PowerPoint, visit the LinkedIn Learning tutorials.
Course Frameworks
The following pages are examples of archetypes of courses you might use as a framework on which to build your actual course. Depending on the specific subject you are teaching, one or more frameworks might be more applicable to your content.
These frameworks are guidelines based on current learning theory, educational research, and teaching best practices – feel free to customize for your purposes, and don’t be afraid to mix and match pieces to form your perfect course.
Remember you will still want to start with Backwards Design, ADDIE, or another baseline methodology to establish your objectives before you jump right in.
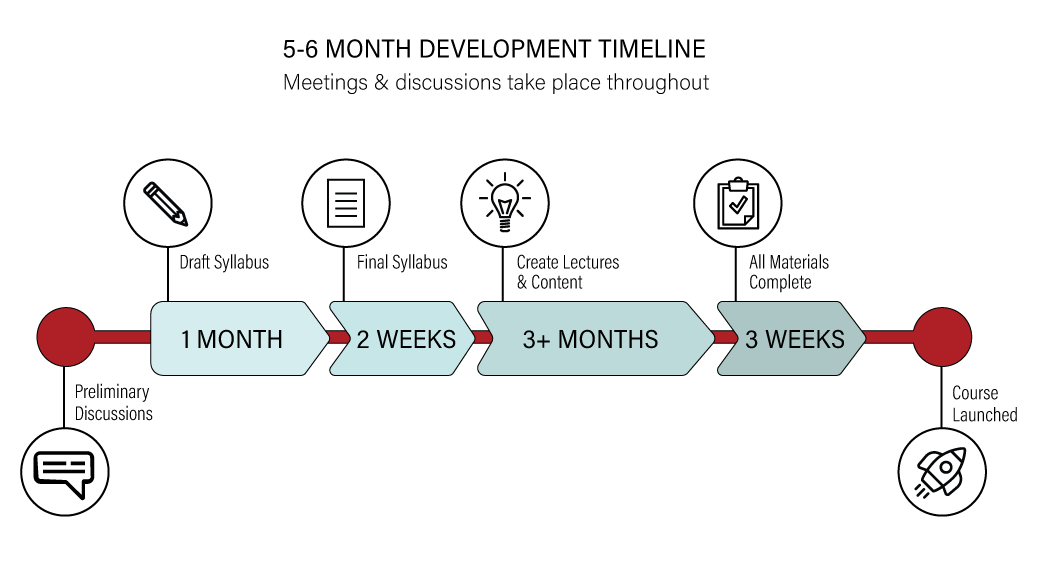
For help with the process of designing your course, you can contact the SFRC online programs office. Remember: when possible, it’s best to give yourself no less than 6 months to design and prepare a new course.
Lecture-Based
What Does a Lecture-Based Course Look Like?
Even in a “lecture-based” course, students should be responsible for taking an active role in their learning through inquiry and discovery. This can be achieved by including a variety of different lecture styles and activities.
The students should ideally engage equally with you, with each other, and with the content.
Example Weekly Content and Tasks:
-
- Introductory video (5-10 minutes max).
- Objectives/guiding questions – give them a framework for critical thinking on the topic for the week to help orient their learning.
- Textbook readings, journal articles, and/or additional web/video resources as desired.
- Lectures presented by PowerPoint or video (10-20 minutes each), 2 or 3 per week, see also: Guidelines for Good Lectures.
- Assignment, self-assessment quiz, discussion posts, live chat, or another deliverable.
- Low-stakes or ungraded assessments are encouraged.
Always have a discussion board available to students for their own collaboration and as a means of connecting with you!
Scaffolded Projects
What Does a Scaffolded Project Course Look Like?
Many types of courses utilize term papers or projects which are split into multiple submissions. This framework further elaborates on that model and incorporates both peer- and self-assessment into the process.
The course can be run as usual with or without lectures (either self-or instructor-directed), and incorporate discussions, journaling, chats, or other assessments – preferably reflective or collaborative in nature.
Option 1:
- Students propose a topic and receive peer commentary from the class.
- Students are assigned to small groups (3-4 per) for peer feedback.
- Paper/project is submitted in steps, with each step undergoing peer review from the assigned group members as well as instructor review and commentary.
- Students incorporate feedback into subsequent submissions and the process repeats until the final submission.
- Final submission is accompanied by a self-assessment using a rubric as well as a self-reflective narrative on the research, writing, and peer review processes.
Typically the scaffolded submissions are not scored, only graded for completion along with participation in the peer-review process. The final submission is scored using the same rubric as the self-assessment. See also: Rubrics
Option 2:
- Students are broken into groups and the class is assigned a project (e.g., design an experiment to test X, write a proposal, etc).
- Groups submit collaborative work throughout the semester, building on the topics learned and applying them towards a final, complete project. Rubrics for each submission are recommended.
- Each submission can be scored along with the final.
Case Study
Use example cases–real-world scenarios—to illustrate and deepen the concepts you are teaching. You can base an entire course around case studies (AKA “problem-based learning”)! What does a Case Study course look like?
In the most straightforward application, the presentation of case studies establishes a framework for analysis. It is helpful if the statement of the case provides enough information for the students to figure out solutions and then to identify how to apply those solutions in other similar situations.
- Case studies can be especially effective if they are paired with a reading assignment that introduces or explains a concept or analytical method that applies to the case.
- You may want to use multiple cases per topic so that students can distinguish the similarities and differences among the cases.
- You could have students role-play the part of the stakeholders involved in the case.
- Outputs can range from short answers to fully developed group action plans, proposals, or recommendations.
Students must actively develop skills in: Problem-solving; analytical tools; quantitative and/or qualitative, depending on the case; decision-making in complex situations; coping with ambiguities
Assess and engage students by posing questions to a discussion board, having teams present their case to the class, use outlines/questionnaires, or even writing position papers based on case study analysis.
Discussion Course
What Does a Discussion-Based Course Look Like?
Discussions facilitate student interactions around course readings and assignments, allowing different types of student learners to contribute and increasing individual student learning and collaboration skills. Students can build a learning community around discussion topics and participate at their own pace.Discussion forums can be used effectively in teaching by allowing students to engage with each other and the material simultaneously.
An Example Discussion Course Might Consist of:
- Introductory video (5-10 minutes max).
- Objectives/guiding questions – provide a framework for critical thinking on the topic for the week to help orient their learning.
- Textbook readings, journal articles, and/or additional web/video resources as desired.
- Discussion prompts (or use guiding questions). Have them post reactions to readings or materials, propose solutions to problems, discuss methodologies, defend a position, etc.
TIPS!
- You may want to have students pose the prompts on a rotating basis.
- Encourage peer commentary by requiring 3-4 responses, plus an original post.
- Be visible, but avoid controlling the direction — only intervene in discussions when necessary or requested.Grade student contributions using a participation rubric.
- Consider posting wrap-up summaries after each week’s discussions are closed.
Flipped Course
Be sure to read How to Flip Your Course also!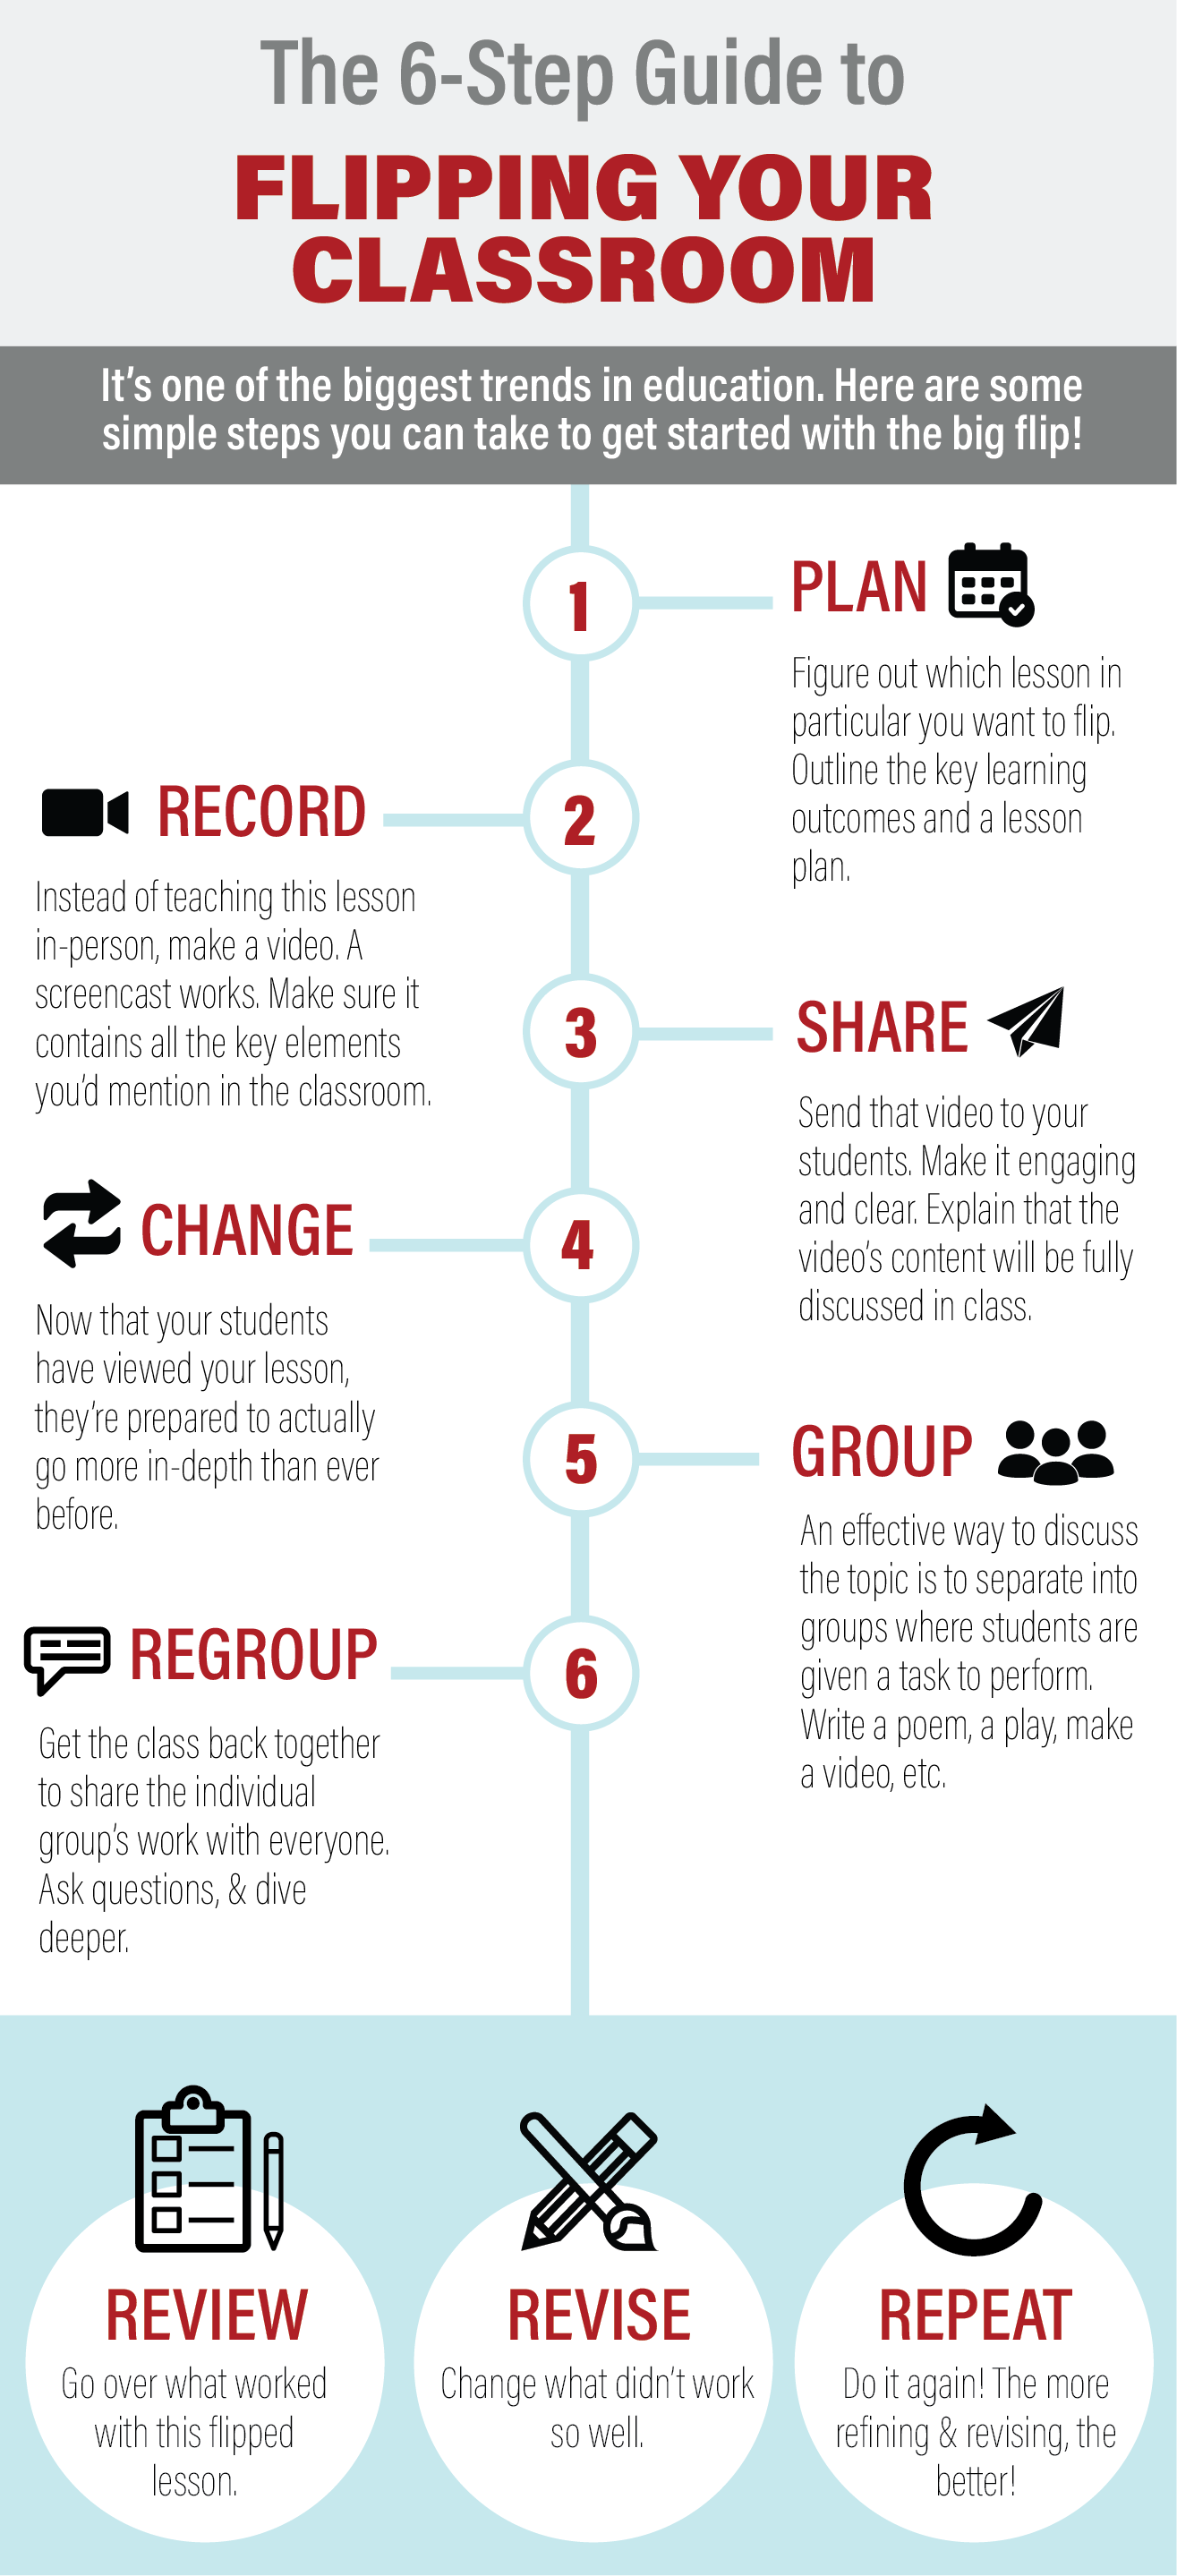 The basic premise of a “flipped” course is one in which the focus during class time is on active, often group, discussion and performance of tasks. It is critical that students prepare for the activities before class.
Objectives and short overviews per module; Textbook or journal articles; Pre-recorded lectures for at-home viewing; Relevant activities such as discussions or group work conducted in class; Opportunities to really facilitate learning instead of transmitting knowledge
In short:
-
-
-
- Establish clear objectives for the topic at hand
-
-
- Pre-record lecture(s) and provide background on the topic
- Plan for in-class activities with deliverables. These often include Readiness Assessment Tests and/or remediation prior to group work or activities.
You may find the one-pager on Team-based Learning helpful.
Learning Activities & Assessment Strategies
A not-at-all comprehensive or complete list of options for learning activities and assessments. Read through them and make notes about which you might be able to apply to your courses. For more information, follow provided links and/or contact the SFRC online programs office to help brainstorm.
Concept Sketches
Concept sketches (different from concept maps) are sketches or diagrams that are concisely annotated with short statements that describe the processes, concepts, and interrelationships shown in the sketch. Having students generate their own concept sketches is a powerful way for students to process concepts and convey them to others. Concept sketches can be used as preparation for class, as an in-class activity, in the field or lab, or as an assessment tool. Download more information on concept sketches, with examples
Case Studies/Problem-Based Learning
The primary hallmark of a case study is the presentation of a problem to solve that revolves around a story (the “case”). Good case studies give the students considerable latitude in deciding how to solve the problem and provide excellent opportunities to engage students in the classroom, especially in groups or teams. The National Center for Case Study Teaching in Science has a collection of case studies in a number of different science disciplines. More information and examples at the Starting Point site
Debates
Debates can be a very useful strategy for engaging students in their own learning. Debates force students to deal with complexity and “gray areas,” and they are rich in embedded content. Debates can also help illustrate the relevance of course material to everyday issues, which can improve student learning. Debates also improve student’s oral communication skills. Download more information on debates, including a rubric for grading debates
Just-in-Time Teaching
Just-in-Time Teaching (JiTT) was developed as a way of engaging students in course material before class and preparing them to come to class and participate actively during class. JiTT is extensively used in flipped classrooms. More information and examples
Background Knowledge Probe
Short, simple questionnaires prepared by instructors for use at the beginning of a course, at the start of a new unit or lesson, or prior to introducing an important new topic. This may require students to write short answers, to choose the correct responses to multiple-choice questions, or both. Can be graded or ungraded.
Minute Paper
The instructor asks students to submit comments related to the following two questions: “What was the most important thing you learned from this lesson?” and “What important question remains unanswered?” Students can submit responses via discussion boards, polls, surveys, or other methods.
Jigsaw Technique
Have you struggled with group work in class? The jigsaw technique can be a useful, well-structured template for carrying out effective in-class group work. The class is divided into several teams, with each team preparing separate but related assignments. When all team members are prepared, the class is re-divided into mixed groups, with one member from each team in each group. Each person in the group teaches the rest of the group what he/she knows, and the group then tackles an assignment together that pulls all of the pieces together to form the full picture (hence the name “jigsaw”). Jigsaw module from Pedagogy in Action
Muddiest Point
The instructor asks students to submit responses to the question: “What was the muddiest point in ______?” The focus of the Muddiest Point assessment might be a lecture, tutorial, discussion, homework assignment, etc.
Analytic Memos
By inventing dialogues, students synthesize their knowledge of issues, personalities, and historical periods into the form of a carefully structured, illustrative conversation. There are two levels of “invention” possible with this technique. On the first level, students can create Invented Dialogues by carefully selecting and weaving together actual quotes form primary sources. On a second, more challenging level, they may invent reasonable quotes that fit the character of the speakers and the content.
“For as long as assessment is viewed as something we do ‘after’ teaching and learning are over, we will fail to greatly improve student performance, regardless of how well or how poorly students are currently taught or motivated.”
– Grant Wiggins, Ed.D., President and Director of Programs, Relearning By Design
Documented Problem Solutions
This technique prompts students to keep track of the steps they take in solving a problem–to “show and tell” how they worked it out. By analyzing these detailed protocols–in which each solution step is briefly explained in writing–instructors can gain valuable information on their students’ problem-solving skills. These can also be used as self-assessments for the students and graded simply on completion.
Student-Generated Test Questions
Students are asked to submit test questions and model answers. This technique helps students to find out how well they understand the course material for which they are writing the test questions.
Journaling
Reflective writing can serve as an invitation for students to participate in the process of learning, as it helps them to reflect critically on the content and can aid in the synthesis of new information. Learners become actively engaged in the learning process when required to write journal entries on a regular basis. Journals allow instructors to provide prompt feedback by replying to postings.
Effective Discussion
Discussion is an excellent way to engage students in thinking and analyzing or in defending one side of an issue, rather than listening to lecture. Students must also respond to one another, rather than interacting intellectually only with the instructor. Review some tips for having a good discussion in class and a sample template for class discussion: Download more information on effective discussions, with a template example
Course-Related Self-Confidence Survey
A Course-Related Self-Confidence Survey consists of a few simple questions aimed at getting a rough measure of the students’ self-confidence in relation to a specific skill or ability. Fostering self-reflection is helpful to student learning. These can be done after every unit or once or twice per course.
Punctuated Lectures
This technique requires students to go through five steps: listen, stop, reflect, write, and give feedback. Students begin by listening/viewing a lecture or demonstration. Then, after a portion of the presentation has been completed (stopped), the students are asked to reflect on the presentation. They then write down any insights they have gained. Finally, they submit feedback to the instructor in the form of short notes.
Scavenger Hunts/Field Journals
You can send your students out into the field to collect samples, document their findings, and reflect in the context of your course content. This is especially useful for life sciences. The final product of the course can be the submission of the digital field journal or collection (photos, text, etc) or even a presentation of the findings.
Semester Papers
Traditional “final papers” can be used online just as in face-to-face courses. Experiment with scaffolded writing where the process begins on day one and continues throughout the course. Try peer review/feedback as part of the process, assigning students to groups to provide each other with ongoing feedback. This fosters teamwork as well as allowing students to learn by teaching and collaborating with their peers.
Cooperative Exams
Also called “two-stage” or “pyramid exams”, are exams that are taken by groups of students working together after they have completed the original exam individually. When done in one class period, students take the exam individually for the first part of the class. Then, when all students have turned in the exam, they retake the exam working in groups and, in some cases, in an open-book, open-notes format. Commonly these exams are multiple-choice exams with or without some short answer questions; the cooperative part may also have one or two longer questions. Suggestion: calculate the total exam score for each student on 70-75% of the individual exam and 25-30% of the group exam.
Weekly Assignments
Students prepare one or two short written assignments each week in which they summarize the critical aspects of a reading assignment, relate data to readings, make comparisons with what they have learned previously, take positions on issues, and analyze or synthesize information and ideas. These assignments can serve as the basis for group or class discussion and oral presentations or require students to pull together information from a series of classes either to solve a problem or to present a summary analysis of a particular topic. Thus, activities that students are engaged in to learn the material are also used to evaluate their accomplishments.
Discussion Strategies
Student participation in an online course doesn’t happen on its own. Done well, active participation can create a sense of community and enrich the classroom experience by offering diverse perspectives.
Assign Graded, Asynchronous Discussions with a Due Date
Make it count. Set the tone that online discussions are important by making them graded and ensure prompt participation with a due date.
Conserve Instructor Effort by Providing a Synthesis After the Due Date
Instructor voice within a course is very important but can be time-consuming. If discussions are given a due date, you can hold your input until after the due date has passed. Read all responses at once, noticing any trends, strengths, weaknesses, etc. Respond to the class as a whole, clarifying anything or giving encouragement and praise as necessary. You can easily make this a video or audio post within Canvas to save typing time. This adds time-sensitive instructor input in courses where the lectures may be prerecorded.
Rethink Your Discussion Prompts
Do the discussion prompts actually promoting discussion– or are they essay questions masquerading as discussion prompts? Are students regurgitating your lectures or readings without much original thought? Are students ignoring the lectures and readings and holding forth with extraneous anecdotes that seem out of place? Try asking students to react to a very short case study. Post a controversial statement and ask them to back up their opinions. Ask students to transfer a concept they learned in the lecture to an entirely different situation. You can check the box “Users must post before seeing replies” to promote original responses.
Assign Graduate Students as Moderators/Leaders
One of the best ways to promote learning is by having students teach others. Try assigning one or two per week to be discussion leaders who can either develop the discussion question on their own or moderate one that is already existing. Giving a little direction upfront can help these discussions get off on the right track. Ask discussion leaders to focus on unifying threads, opposing views, or just keep the dialog going with questions and encouragement.
Use Discussions as a Forum for Peer Review
Have the students propose a project, or share a draft of an assignment, and require their peers to review and offer commentary for participation credit. Then have them incorporate their peer’s suggestions before the final submission of the assignment or project.
Consider Alternating Between Asynchronous Discussion Board Posts and Live Online Chats
Do what works for you and your students, and don’t be afraid to be flexible – online chats can be recorded. Even having just two of these per semester in place of asynchronous discussion posts can improve student perceptions of your course and gives them the opportunity to interact with you and their classmates.
Use Discussions as a Q&A Collection for the Course
Discussions can provide a resource for future offerings of your course if you collect the questions that students are asking (and their answers). Share past questions to help deepen and clarify for current students.
Check out this in-depth PDF from Edutopia on Mastering Online Discussion Board Facilitation
Team-Based Learning
Team-based learning (TBL) is a structured form of small-group learning that emphasizes student preparation out of class and the application of knowledge in class.
Group work used in TBL encourages deep engagement with content through active and social learning and fosters personal accountability and student ownership of their learning. Group assignments and activities allow students to develop and refine their collaboration skills while applying acquired knowledge to a given problem or situation.
- Students are strategically assigned to teams of 5-7 individuals.
- Preparation for the in-class activity is done outside of class (readings, videos, etc).
- In class, a “Readiness Assurance Process” is completed in which students individually perform a task such as a quiz or a short assignment. The same task is then given to the teams so that students have to collaborate and negotiate to formulate group answers. Both individual and group scores contribute to the students’ grades.
- After the students complete the group test, the instructor allows teams to appeal questions that they got incorrect. The appeals process encourages students to review the material, evaluate their understanding, and defend the choice they made.
- To conclude the Readiness Assurance Process, the instructor gives a mini-lecture that focuses on concepts with which students struggled the most.
- Team project/activity begins. This should require the teams to make a specific choice about a significant problem. Address an issue, determine the best possible outcome, propose a solution, formulate a plan, etc – with a focus on applying the knowledge that was gained in the preparatory activities.
- Importantly, all teams work on the same problem and report their decisions simultaneously. This structure requires teams to articulate their thinking, and gives teams an opportunity to evaluate their own reasoning when confronted with different decisions that other teams may make.
Students exhibited higher mean scores on questions that assessed knowledge of content learned via TBL than on questions assessing content learned using other methods.
Importantly, students within the lowest quartile showed the greatest gains: an average improvement of 7.9% for students in the lowest quartile as compared to an average improvement of 5.5% for all students.
Koles et al, 2010
Resource: Detailed TBL handout from the University of British Columbia
Peer evaluation is an important part of team-based learning; it is essential for keeping students accountable to their teammates. Incorporate peer evaluation by having students distribute a set number of points among their teammates, by using an evaluation rubric, or some combination. You may wish to grade students on how substantive their peer feedback comments are, rather than allowing them to assign each other points.
Team-based learning is alternately known as “Peer Instruction” and is related to “Collaborative Learning” as well. There are many resources on this topic.
How to Flip a Course
You’ve probably heard the terms “flipped course” by now – but what does it mean?
A Flipped Course Reverses the Lecture/Homework Paradigm
Traditional course: students attend lectures as a group and then work out problems or complete assignments individually outside of class.
Flipped course: students get the bulk of the course content outside of class such as through readings and/or recorded lectures. Then, in-class time is devoted to working through that content: discussing, problem-solving, processing, problematizing issues, working in groups, case studies, debating – generally going deeper into the content and developing higher-order thinking skills, including analysis, evaluation, and creation.
Years’ Worth of Evidence Shows Students in Flipped Courses Score Better on Both Learning Outcomes and Satisfaction
A quick Google Scholar search will provide you with as much literature as you like on this! There’s more than can be summed up here, and the data doesn’t lie.
Dr. Eric Mazur is a good place to start; he flipped Physics for non-majors in the early 1990s and has been influential in the field of educational research ever since. See also:
Courses with Large Amounts of Content to Cover are Ideal for Flipping
In these classes, instructors often end up lecturing for the majority of the class in order to make sure they cover all the information. This means students must go home to work in isolation as they make an attempt to synthesize the new concepts and apply them in some meaningful way. The irony here is that it’s virtually impossible to apply theory in a meaningful way when working alone. Instead, use the time together in class to discuss meaning and apply new knowledge through peer and student-teacher interactions and activities.
The Flipped Classroom is:
- A means to increase interaction and personalized contact time between students and teachers.
- An environment where students take responsibility for their own learning.
- A classroom where the teacher is not the “sage on the stage”, but the “guide on the side.”
- A blending of direct instruction with constructivist learning.
- A classroom where students who are absent don’t get left behind.
- A class where content is permanently archived for review or remediation.
- A class where all students are engaged in their learning.
- A place where all students can get a personalized education.
What about “blended learning?”
This muddy term indicates a course that is typically 30-80% delivered online. So flipped courses are often, but not always, blended – but blended courses need not be flipped.
Make sense?
“Owning” Your Courses
Teaching online is vastly different than lecturing in front of a classroom. The students don’t know you are there just because you are – you have to have an active, tangible presence in the shared online space of your course if you want them to feel engaged with you.
How to Assert Yourself as the Guiding Presence in an Online Course:
Rule #1: Don’t be shy.
You are the instructor and students want to see your face. They want to chat with you. They want to receive emails, announcements, and most of all feedback from you (especially at the graduate level). Use a photo avatar! Record 30-60 second “check-in” videos ad hoc, to clarify a point or suggest a project option, or even just to praise their efforts. Establish yourself as the cornerstone of the course, even if the content and activities are largely self-directed.
Rule #2: Don’t be afraid to break the course.
Canvas has a lot of neat options, tools, and tricks that you should experiment with, learn, and use! Want to edit the text on Week 3’s page? Need to update an assignment due date? Go ahead! There’s an especially great thing called “undelete” just in case you mistakenly dispose of your 100-question final exam on a Saturday night… but if you are just too timid to try using the system on your own in an active course, request a sandbox as a place to try new things and experiment with abandon.
Rule #3: Alter the plan if you need to.
Your syllabus is a “contract” but it’s a tentative one that can change as circumstances arise (feel free to include a disclaimer if you like). If you make it halfway through your course and realize that more or less time should be spent on upcoming topics or activities, make the call! Better yet, poll your students for their buy-in and make a democratic choice about potential alterations to the schedule.
Rule #4: Be the expert you are.
Again, students want to hear from you. Post corrections, clarifications, questions, and encourage them to think deeply about the concepts in your course. Challenge them. Talk about your research, go off on a tangent, or provide them with threads to follow up with on related topics that aren’t necessarily part of the course. Tie in current events with your materials on the fly. Allow them to ask you questions and answer them publicly in the course discussions.
Rule #5: Don’t fear the feedback.
Student feedback is one of the most important measures of whether or not we are effective as instructors, administrators, and facilitators. The process of asking for feedback itself breeds trust between you and your students because they recognize that you care what they think. You will receive feedback, and you should strive to appreciate it for what it is: opportunity to improve (or, perhaps, to brag). Reinvest in your course and revise the content and/or strategies based on your students’ feedback… and watch for the payoffs next time.
Iterative Design, AKA Using Student Feedback
Iterative design is an approach of incrementally developing and refining a design based on feedback and evaluation. Iterative design can apply to a learning experience, the creation of media, or the development of learning systems. (instructionaldesign.org)
Your students are your evaluators and can provide valuable feedback on how well your course worked or what might be problematic.
Evolution as Iterative Design
There is a parallel between iterative and the theory of Natural Selection. Both involve a trial and error process in which the most suitable design advances to the next generation, while less suitable designs perish by the wayside. Subsequent versions of a product should also get progressively better as its producers learn what works and what doesn’t in a process of refinement and continuous improvement.
This feedback can—and perhaps should—be collected separately from your Faculty Evaluation. The kinds of questions that provide insight into your course delivery are often not asked by the University for tenure and promotion purposes.
How to Get Good Feedback
In a nutshell: ask the right questions! And be prepared to listen and act. Consider the suggestions on the next page as a starting point; mix and match as you see fit.
Let the students know you will use their feedback and that it means something. You might solicit feedback partially through the semester as an opportunity to revise the course as it is happening, to correct problems, or enhance student learning. This fosters trust, as the students will be able to see their feedback in action and benefit from it directly.
End-of-term surveys are also common and can help you improve for future offerings, just be careful not to overlap with Faculty Evaluation periods or risk suffering a lowered response rate.
Respond to your students and let them know how you plan to use their feedback. Clarify aspects of the course that they expressed confusion or misunderstandings about. Let them know what they can do to improve their own experiences based on how they responded.
Applying student suggestions (and dealing with complaints)
First, look over the positive things your students have said about the course.
Then read their suggestions for improvement and group them into three categories:
- Things you can change this semester (for example, the turnaround time on homework assignments)
- Things that must wait until the next time the course is offered (for example, the textbook)
- Things that you either cannot or, for pedagogical reasons, will not change (for example, the number of quizzes or tests)
- You may also want a category of things you are unsure about or do not know how to change, i.e., “Things to research”
Discuss the feedback you receive with a consultant (such as your teaching support staff, a senior faculty member, or someone similar) who can help you process it and pull out actionable items. They may have ideas for the items you are unsure about how to change.
Most of all, try to move away from emotional reaction to a reflective, intellectual frame of mind when considering student feedback.
