
Modules – Skills & Tools
Visualizing Microbes
Background Information
WHY YOU SHOULD CARE ABOUT: Visualizing Microbes
Visualizing microbes is probably the biggest breakthrough after growing microbes to enable research and treatment. We have come a very long way since Leeuwenhoek’s animalcules and new developments in the field of microscopy, with higher resolution, better preservation of structures and incredible imaging tools have enabled to newly illuminate the world of microbiology that’s hidden from most.
(TEM of Borellia burgdorferi (M. Oli) and Unsplash: This illustration depicted a three-dimensional (3D), computer-generated image, of a group of Gram-positive, Streptococcus pneumoniae bacteria. The artistic recreation was based upon scanning electron microscopic (SEM) imagery.)
Gram-Staining
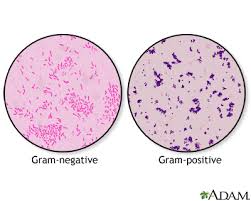
The Gram stain reaction is based on the difference between the thickness of the cell wall structure between Gram + (stain purple, thick peptidoglycan) and Gram – (stain pink, thin peptidoglycan) organisms. The image on the left below shows the different cell wall structures that distinguish between gram positive and negative bacteria.
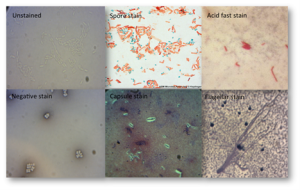
Other stains commonly used in the microbiology lab are based on charge of dyes/cells, ultrastructure and other methods. Negative stain, capsule, spore and flagellar stain are used less often these days in the diagnostic lab, whereas acid fast stain to detect mycobacteria (causing TB) are still used a lot. Today specific fluorescent dyes are also used.
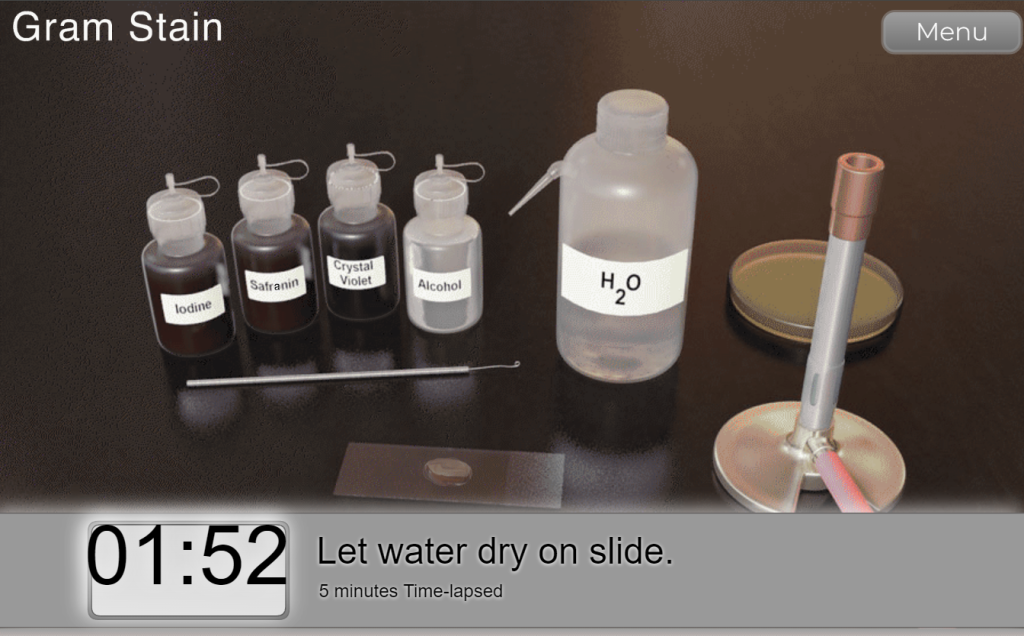
Before you start with the stain there are 2 essential steps you need to perform:
1. Completely dry your cells on your glass slide
2. Fix your cells to the glass slide so that they don’t wash off. This can be done by heat fixation or fixation with ethanol or methanol, which is the method we use in the teaching lab and at home.
Learning Objectives
After completing this module, students will be able to:
- Recall new vocabulary and definitions that pertain to this module.
- Properly prepare and view specimens for examination using microscopy (Gram stain, other stains).
- Describe bacterial staining techniques and understand the importance of charge in the staining process.
- Explain the Gram stain reaction and reagents and Identify the differences between Gram-positive and Gram-negative bacteria.
- Recognize images prepared by different staining methods and by different microscopic techniques used techniques.
- Explain at least 4 different methods of microbial stains (Gram stain, simple stain, negative stain, spore stain, acid fast stain).
History Connections
Virtual Lab Simulations
Bacteriology Laboratory: Online simulation of Gram Stain
Take a screenshot and put the image of your stain into your ELN.
Online Lab
Activity: Perform a Gram Stain
Lab Kit Materials for this Activity
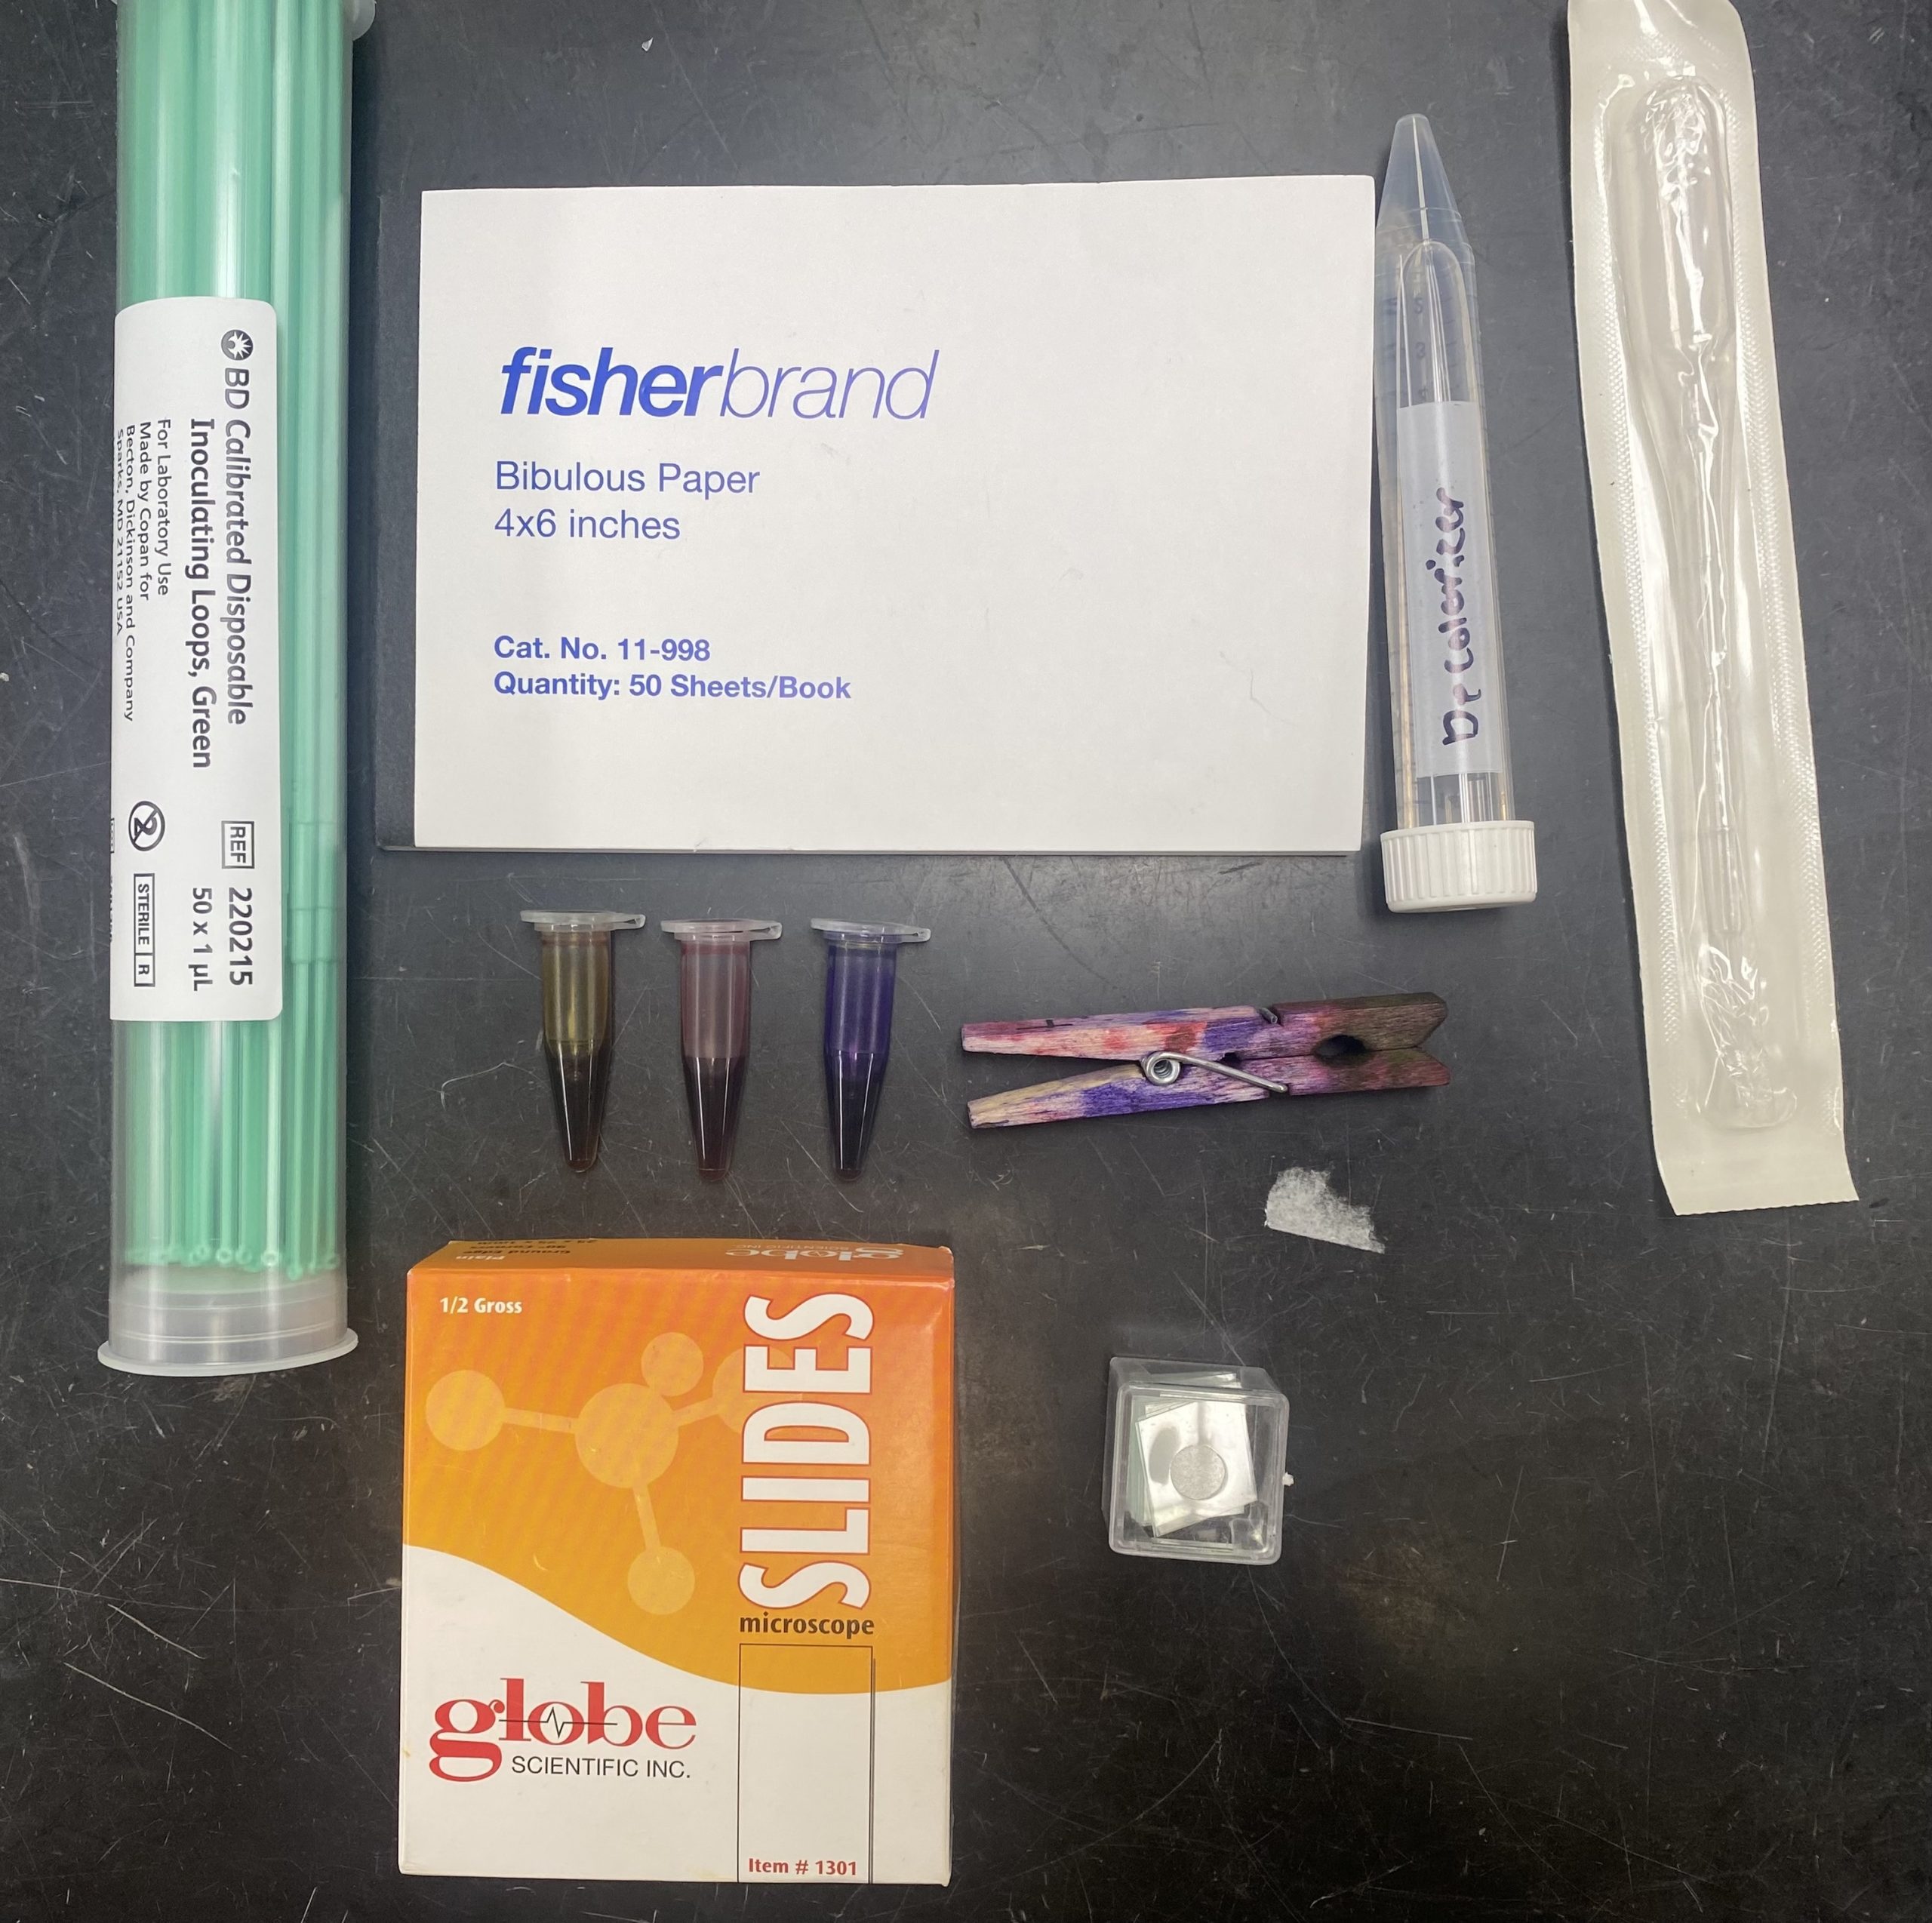
- Bacterial cultures
- Gram stain reagents (CRIES): Crystal Violet (Cr), Iodine (I), Ethanol (E), Safranin (S)
- Glass slides box (previous module)
- Cover slip box (previous module)
- Transfer Pipette (3x)
- Clothes pin
- Inoculation Loops (previous module)
- Bibulous Paper
- Swab
Self-Provided:
- Paper towels
- Tupperware bin or container for washing
- Ethanol
- Water
Video Tutorials
Performing a Gram Stain
Negative Stain
(Online students are not required to perform a negative stain, but this video tutorial should be watched to build understanding of other staining methods.)
Cheek Cell Swab Wet Mount
Procedure
Performing a Gram Stain
- Label the microscope slide
- Detach pipette tip box lid or use self-provided tupperware/ container to use for catching extra dyes
- Add sample to the glass microscope slide (choose one of the following):
- Cheek Swab: Drag swab across cheek. Add small drop of water to a glass slide and use swab to make a small smear of cells across the slide. (It might not be visible) Follow video tutorial above to see how to take a cheek sample and mount it onto a slide.
- Bacterial culture: Take a loopful from one of your liquid bacterial cultures and make a small smear across your glass slide.
- Allow the suspension to AIR DRY COMPLETELY.
- Fixation of the cells: add 100 μl of ethanol (decolorized) to your slide on top of the dried smear and fix cells to slide for 30-60 seconds. Let run off and continue with the next step.
- Primary Stain – Crystal Violet: Using the P200 pipette (with a pipette tip, draw up 100 μl of CV and gently add to fixed sample and spread liquid over the entire sample area. Let CV sit for 1 minute on slide.
- Mordant – Gram’s Iodine: Using a transfer pipette, draw up 0.1mL of iodine (first notch of pipette) and gently add to the slide and mix with CV. Let iodine stand for 1 minute on slide
- Decolorization – 95% EtOH: Pick up microscope slide with clothespin. Using your P1000 pipette (and tip), draw up 0.5 mL of decolorizer, use more if needed. Tilt the slide into upturned box lid and add decolorizer DROP BY DROP until run-off is completely clear.
- Rise gently with a stream of water for 2-3 seconds, using a transfer plastic pipette.
- Counter Stain – Safranin: Using your P200 pipette, draw up 0.2 mL of safranin (first notch of pipette) and gently add to the slide and let stand for 30-60 seconds.
- Rise gently with water for 2-3 seconds
- Blot (DO NOT RUB) the smear dry with bibulous paper (put the slide between the sheets and tap gently).
- View your gram stain slide under the microscope. Reference back to the “Art of Microscopy & Life in a Drop of Water” module for tutorials about viewing slides and using your microscope.
Results
Document the following in your ELN:
- Understand the different steps of the Gram stain and what each step is for
- What do Gram + and Gram – cells look like at each step? What is the difference between Gram + and Gram – organisms? Why do they react differently? Are all organisms either Gram + or Gram -?
- Identify whether your sample is gram positive or gram negative and why.
- Include pictures of your gram stain under the microscope.
In-Person Lab
Activity: Visualizing Microbes
Video Tutorials
Gram Stain Tutorial
Negative Stain
Procedures
Negative Stain Procedure
For bright field microscopy, negative staining is typically performed using a black ink fluid such as nigrosin. The specimen, such as a wet bacterial culture spread on a glass slide, is mixed with the negative stain and allowed to dry. When viewed with the microscope the bacterial cells, and perhaps their spores, appear light against the dark surrounding background. An alternative method has been developed using an ordinary waterproof marking pen to deliver the negative stain.
- Place a very small drop (more than a loop full-less than a free-falling dropper a loop full) of nigrosin near one end of a well-cleaned slide.
- Using a cheek swab, your hay infusion or a small amount of the culture from the slant or plate with an inoculating loop and disperse it in the drop of stain without spreading the drop.
- Use another clean slide to spread the drop of stain containing the organism using the following technique.
- Rest one end of the clean slide on the center of the slide with the stain. Tilt the clean slide toward the drop forming an acute angle and draw that slide toward the drop until it touches the drop and causes it to spread along the edge of the spreader slide. Maintaining a small acute angle between the slides, push the spreader slide toward the clean end of the slide being stained dragging the drop behind the spreader slide and producing a broad, even, thin smear.
- Allow the smear to dry without heating. Do NOT blot dry as it will remove the sample from the slide.
- Focus a thin area under the microscope and observe the unstained cells surrounded by gray/black colored stain.
Other stains commonly used
Acid fast stain to detect Mycobacteria, Cryptosporidia, etc.
- The high mycolic acid content of certain bacterial cell walls, like those of Mycobacteria, is responsible for the staining pattern of poor absorption followed by high retention. The most common staining technique used to identify acid-fast bacteria is the Ziehl-Neelsen stain, in which the acid fast bacilli are stained bright red and stand out clearly against a blue background.
Endospore stain
- Gram staining and simple staining techniques may or may not reveal the presence of endospores in a bacterial sample. Since confirming the presence or absence of the endospores establishes the identification pathway to pursue, methods for visualizing the endospores and the free spores in a sample were developed. Relatively few species of bacteria produce endospores, so a positive result from endopore staining methods is an important clue in bacterial identification. In a clinical setting, identification of pathogens includes describing the shape and position of the endospores present. During microscopic examinations, the endospore stain can yield this information. While staining is probably the most common approach, laboratories that use phase-contrast microscopy can obtain the same information without the staining step.
Flagella stain
- Bacteria may be motile by a variety of mechanisms, but the most common involves flagella. The purpose of the protocol is to stain bacterial flagella, thus to reveal the presence or absence of flagella as well as their arrangement on the perimeter of the cell. These traits can be used to characterize bacteria phenotypically, as not all bacteria are flagellated and those that are will possess these structures in various locations extending from the cell membrane.
Immunofluorescence
- Immunofluorescence is a technique used for light microscopy with a fluorescence microscope and is used primarily on biological samples. This technique uses the specificity of antibodies to their antigen to target fluorescent dyes to specific biomolecule targets within a cell, and therefore allows visualization of the distribution of the target molecule through the sample. A fluorescent microscope and the appropriate filters have to be used to image the samples.
- Dr Oli did a lot of immunoflourescence work during her PhD
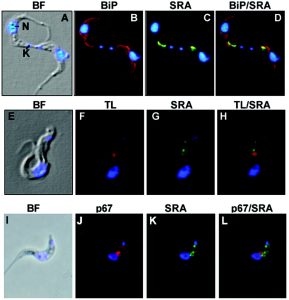
Oli, Monika W., et al. “Serum resistance-associated protein blocks lysosomal targeting of trypanosome lytic factor in Trypanosoma brucei.” Eukaryotic cell 5.1 (2006): 132-139.
Results
Typical results seen with 1000x oil immersion lens include:
- Draw what you see in the microscope (cheek cells and bacteria)
- Understand the different steps of the Gram stain, what is happening and what do Gram + and Gram – cells look like at each step?
- What is the difference between Gram + and Gram – organisms? Why do they react differently?
- Are all organisms either Gram + or Gram -? What about human cheek cells, what is the Gram reaction?
Resources
Case Study
You are examining lung tissue from a patient that died of pneumonia. You are pretty good at the Gram stain, but you notice that the results are very variable between the different samples. You try it again and one sample did not show any organism under the microscope. What is a common disease that affects the lungs of a patient but does not perform in a typical Gram stain? What other stain should be used?
What could the pathogen be?
