
OLD SECTIONS
29 Canvas Setup (Move)
Jennifer Smith
The more material that you have ready to go before the start of the semester, the more fun you can have interacting with your students. Preparation before the semester starts can also help your TAs be as effective as possible. A clear semester plan with details about upcoming assignments will help students plan their own workloads (not every student will do this, but the ones who do will appreciate the assignment information).
 See more details about using Canvas in the Teaching and Learning with Technology part of this book.
Canvas Course Site Request | Add a Non-Registrar Sub-Section | Canvas Copy and Set Up | Update Canvas Content | Check All Settings and Deadlines | Collaborator Canvas Access | Create Groups | Message Students | Set Your Canvas Notifications and Update Profile | Publish the Course
Canvas Course Site Request (3 weeks before term start)
You may request your Canvas course site approximately 3 weeks prior to the start of classes.
- You must be listed as the instructor of record to request your course.
- If your courses are normally requested by someone else in your department, please contact them to make sure this is still the case before requesting your course.
- Course auto-creation will begin approximately two weeks prior to the term start date.
- Any course not requested or marked to exclude from Canvas will be created on that date.
- If you need to have sections combined into one shell, please make your course request BEFORE courses are created automatically.
Exclude from Canvas within the myUFL interface
If you select the Exclude from Canvas option in the Canvas Course Request module in myUFL for a course that has already been requested for Canvas, it will remove any students who were enrolled in the section and prevent any future enrollments of students.
If you have a section that should have students, but currently doesn’t have anyone enrolled, please check in the request system to see if that option was selected. Once you un-select that option, students should be enrolled within 24 hours.
If you have any questions, please contact e-Learning Support at 352-392-4357 option 3.
How to Request Your Shell
- Upcoming term codes:
- Fall 2021: 2218
- Spring 2022: 2221
- Summer 2022: 2225
- Fall 2022: 2228
- Log in to One.UF with your Gatorlink username and password.
- Under Canvas Shell Request, choose Go To Canvas Shell.
- Choose the Term from the drop-down box in the upper right corner.
- You may select all sections of a course or individual sections.
- Title the course and click the Next button at the lower right corner.
- You can add teachers, instructional designers, facilitators, TAs, and observers by clicking the +Person button.
- You’ll need their Gatorlink username.
- Choose the role and section for each.
- View step-by-step instructions with screenshots.
Request a “Development” Shell
You can work on your Canvas course site before they become available through One.UF. To do this, request a “development” shell.
- Visit the e-Learning Course Request page (elearning.ufl.edu > Instructor Help > e-Learning Course Request).
- Choose Non-registrar Course Request Form.
- Choose Development Shell from the Type of Shell drop-down list.
- You can add instructional designers, teachers, observers, and TAs to this site as well.
- Set up the course as you like and when the term Canvas shells become available, copy the course to the registrar shell.
Add a Non-Registrar Sub-Section
It may be helpful to divide students into sub-sections. The Canvas classic quizzes and new quizzes are not group-aware. With sub-sections, you can assign exam versions to different groups of students.
- Login to my.ufl.edu.
- Navigate to My Canvas Course Management (Main Menu > Student Information System > Online Learning > My Canvas Course Management).
- A list of courses for which you have teacher or facilitator access will load.
- Choose the course to which you want to add a section(s).
- Click the Filter Section drop-down arrow.
- Choose Create Section.
- Name the section as you like.
Enrolling Students in Non-Registrar Sub-Sections
Students must be enrolled in the main course section in order to be placed in a sub-section. It is best to assign students to the sub-sections after the drop/add period is over.
- Click on the button to Download Enrollment Requests Table to Excel (located in the Enrollment Requests header row).
- Use this spreadsheet to assign students to a subsection.
- Next, Bulk Enrollment from the tabs at the top of the page.
- Choose the section to which you want to add students from the Section drop-down menu.
- Copy/paste the UFID numbers from the Excel Spreadsheet into the window and click the Insert UFIDs button.
- The students for that section will appear below.
- Click the Process Enrollment Request button at the bottom of the page.
Once your subsections have been created, you can use the Assign to feature in Quizzes (one of the Edit options) to assign different quizzes to different groups of students. Be sure to remove the Everyone sections, to ensure that only students who are supposed to have access receive the exam.
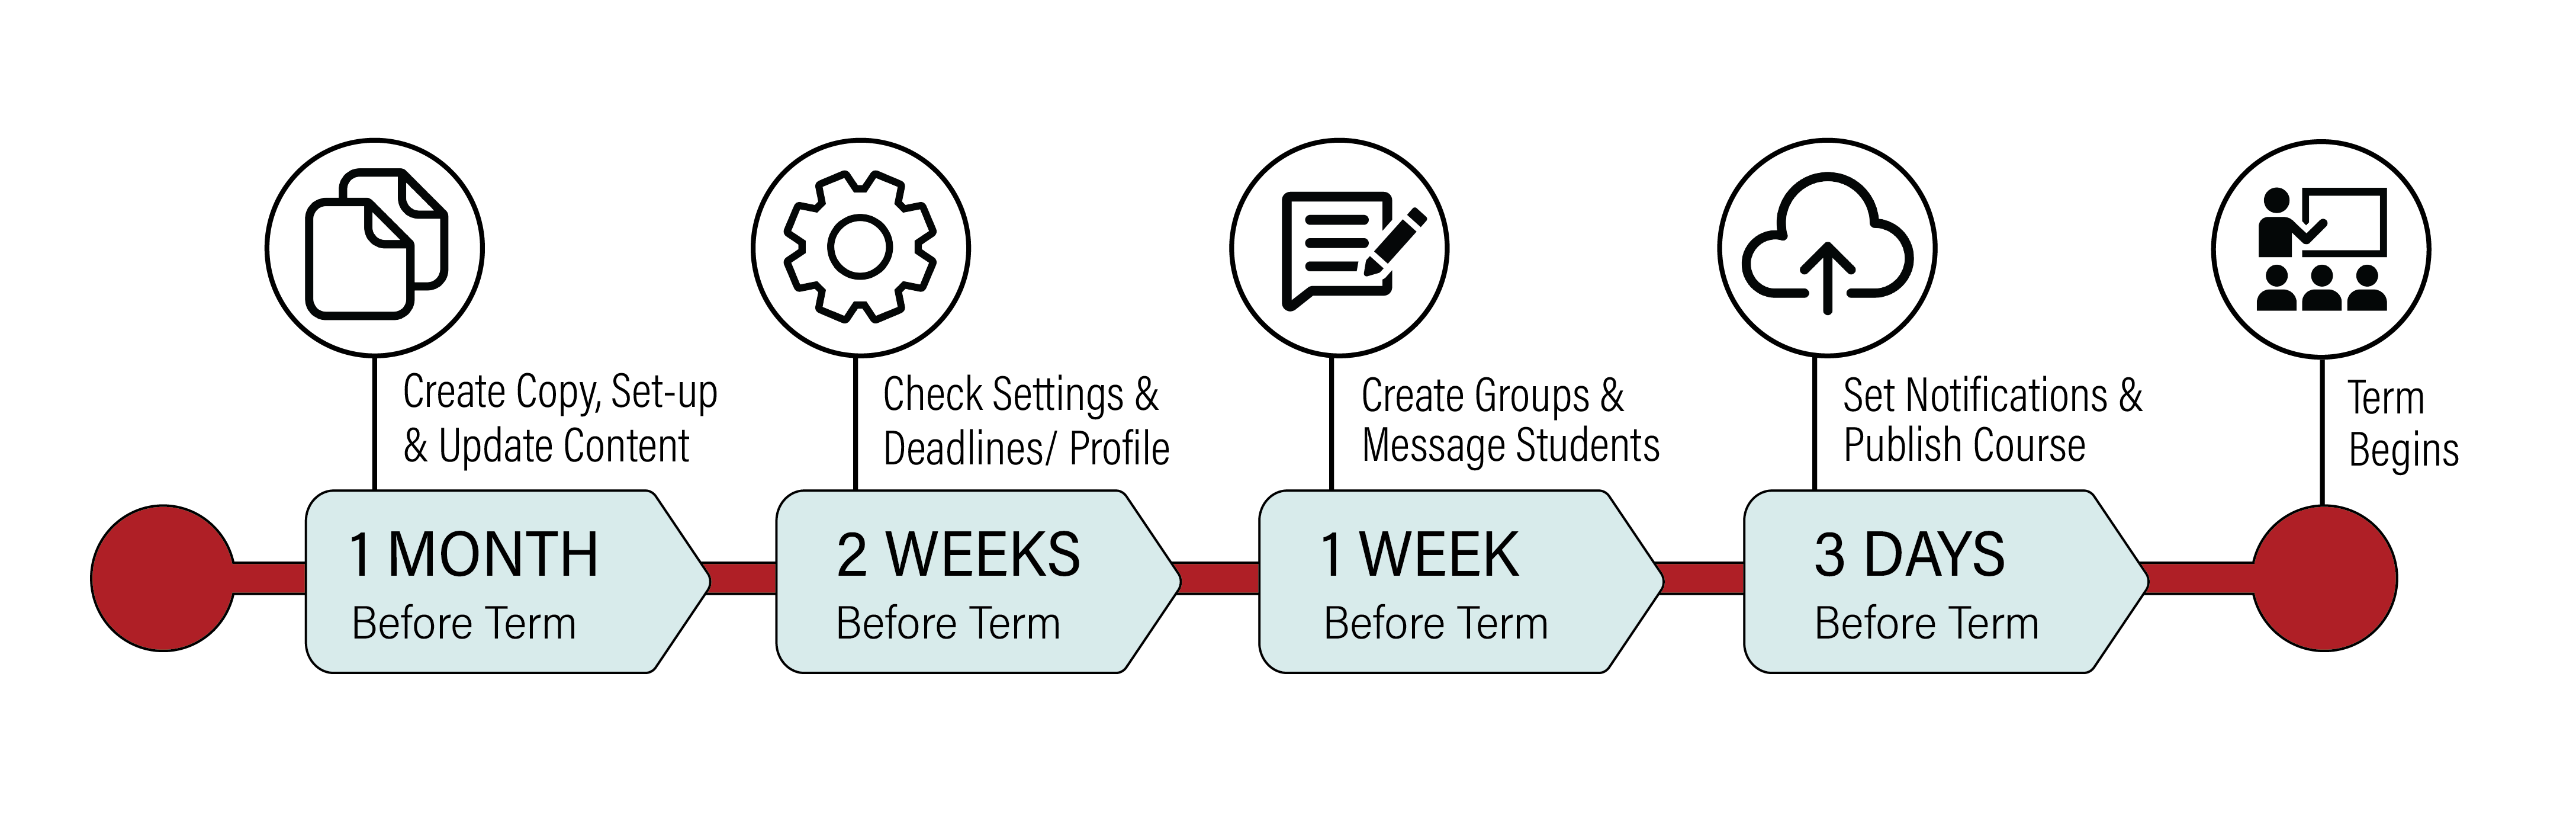
Canvas Copy and Set-Up (3 weeks prior to term start)
Refer to the Canvas Guide on how to copy a Canvas course. You’ll need instructor or facilitator access to both the course you wish to copy from and the course you are copying to. You can choose to copy all content or select specific elements (such as quizzes.)
Change the due dates by clicking the “Adjust events and due dates” checkbox. You’ll be prompted to identify the days of the week you would like for the new course deadlines. You will need to manually adjust dates to accommodate holidays. Be sure to double-check all deadlines. This can save many headaches for you and your students!
If your course has a lot of large files, it may take some time to copy.
NOTE: This process will copy and update due dates, but calendar events will need to manually adjust holidays.
Update Canvas Content (1 month or earlier before term start)
See the instructions above for requesting a Canvas “development” shell that will allow you to prepare course content prior to the start of the term. Screenshots and steps for editing content can be found in the Canvas Guides: How do I edit a page in a course? Be sure to keep Accessibility requirements in mind. What are accessibility requirements?
- Use headings and subheadings to divide your Canvas or other document content.
- Be sure that there is sufficient contrast between your text and background (watch out for gradients!)
- Use “alternative text” to describe any images.
How do you do ensure Accessibility? Visit:
- UF Accessibility: Course Accessibility
- Center for Teaching Excellence: Quick Guide to Online Course Accessibility
Check All Settings and Deadlines IMPORTANT! (2 weeks before term start)
Perhaps the most important thing you can do to save yourself time and reduce student frustration is to double and triple-check ALL quizzes, discussions, and assignment deadlines and settings. If you have TA assistance, ask your TA to check these as well. Things to watch for:
- Canvas Guides: How do I add or edit details in an assignment?
- Make certain that the AM and PM deadline time is correct.
- Discussions: Canvas only allows one deadline for the assignment so in order to have a deadline for the initial post as well as the reply(s) you’ll need to add the second deadline as a calendar event.
- Calendar events do not copy over automatically, so those need to be set up manually each term (you’ll have to delete the old calendar items.)
- Remember to click the Publish button!
- Make sure that all of your modules are published as well (otherwise your students won’t see anything!
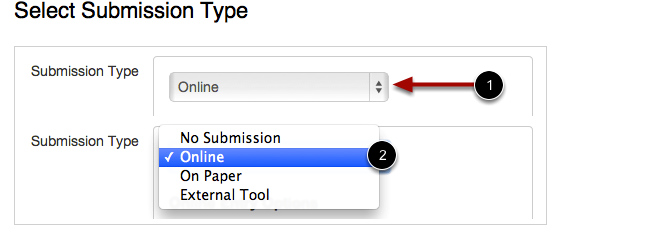
- Note: Assignments are set to No Submission by default. You must change that setting or students won’t have a place to submit their assignment. (see below)
Collaborator Canvas Access
Giving Collaborators Access to Canvas
You can add TAs and other people to your Canvas course through the Manage Users link in the left navigation.
- Click the Add Users tab.
- Type or copy/paste Gatorlink usernames or UFIDs separated by commas.
- Be sure to select the appropriate role from the drop-down menu.
- Click the Next button at the bottom.
- On the next screen be sure to click the Add Users button at the bottom!
Giving Collaborators Access from my.ufl.edu
The “My Canvas Course Management” tool in my.ufl.edu can be used to:
- Add TAs or observers
- Remove any user for any reason
- Create sub-sections to organize students into workgroups or other logical groupings
Access to this feature in my.ufl.edu is granted by two methods:
- Being associated in the UF Directory as Faculty, Courtesy Faculty, Emeritus, UF Executive, or Clinical Faculty (as defined by role UF_HR_Faculty)
- Requesting the role UF_SA_CANVAS_TEACHER_CRSE_MGMT via your Department Security Administrator in ARS
Confirm that you have the appropriate permission to add users to the Canvas course in my.ufl.edu:
- Log in to my.ufl.edu
- From the Main Menu drop-down window > My Account > My Roles
Add/Remove Canvas Users
Confirm that you have the appropriate permission to add users to the Canvas course in my.ufl.edu:
- Log in to my.ufl.edu.
- From the Main Menu drop-down window > UF Campus Solutions > Online Learning > My Canvas Course Management.
- You’ll see a list of courses for which you have been designated Teacher or Facilitator in Canvas.
- Select the desired course from the list
- To add users one at a time:
- Click the plus sign to the right of the list of people who are currently enrolled in your course.
- Enter the UF ID of the person you wish to add OR
- Click the magnifying glass and do a search using the name or Gatorlink username.
- Choose the desired Role from the drop-down menu.
- Choose the desired section.
- You can add teachers, TAs, observers, guest lecturers, auditors, facilitators, and designers to the INIT (Registrar) section.
- Add students who are making up an incomplete to the MISC section.
- Choose whether you wish to limit the new enrollment to that specific section.
- Choose Add from the “Action” drop-down menu.
- A confirmation box will appear.
- Click the OK button.

Create Groups (After Drop/Add)
You can set up your groups at the start of class, but be sure to “add unassigned students to groups” throughout drop/add (see below.)
Create Groups
- People > + Group Set > Group Title > Create enough groups to equal the desired number of students per group.
- IMPORTANT! Check the groups during the first week of classes to click the “add unassigned students” to groups daily.
- If you don’t do this, students will post their comments on the root of the discussion and no one will be able to respond nor will you be able to grade them in SpeedGrader.
- Canvas Guides: What are Groups?
- Canvas Guides: How do I automatically assign students to groups?
- Canvas Guides: How do I manually assign students to groups?
Message Students (2- 3 days before term start)
Welcome students to your class with an email before class begins and throughout drop/add to let them know where to go and what to do when they get there. Sometimes, students are unaware that there are online materials available for their course and/or don’t know how to access them. This is also a good time to give them information about required textbooks so that they will be ready to begin working as soon as class begins.
Example of Welcome Email Message:
Hello Everyone!
I will be your instructor for [Course name]. The class will begin at 8:00 a.m. on [date and time], but I’d like to give you some information that will allow you to get a head start. Please view my welcome message (use your Gatorlink username/password to sign in.) The syllabus and bibliography are attached. Please go ahead and purchase the required texts as you will need them right away.
- [textbook or other resource information here]
Follow the directions below to log into the course.
- Go to the e-Learning website
- Choose “Log in to e-Learning”
- Use your Gatorlink username and password to log in.
- Click on “Courses” at the top of the page
- Choose this course: [course name and number] from the list
- View the materials and complete the syllabus quiz in the “Start Here” section of the Course Materials page.
- Don’t delay logging into the course as you have assignments due soon!
If you have trouble logging into the E-learning system, contact: helpdesk@ufl.edu or call (352) 392-4357.
I look forward to an interesting and engaging semester with you!
Sincerely, [Instructor Name]
This email should go out two days before class begins and every day until the Drop/Add period ends.
See instructions for sending the email within Canvas below. You can also request a listserv for your course (see below.)
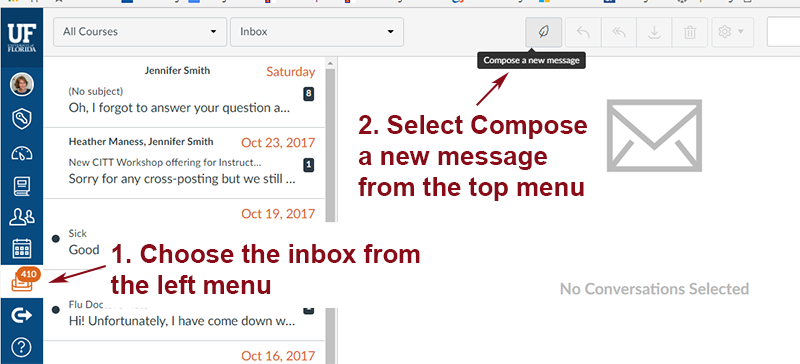
Sending an Email to the Class Within Canvas
You can use the Canvas mail tool to send a message to your class. The course does not need to be published to do this.
- Click on the Inbox in the left navigation.
- Select the Compose a new message icon from the top menu (it’s a feather).
- Select the course you wish to message.
- Click on the directory icon to the right of the To field to select message recipients.
- Write your message.
- Record audio/video and add attachments using the icons in the lower-left corner.
- Click Send in the lower right-hand corner.
Using the UF ListServ to Send Welcome Message
Another option is to send the email through a course listserv.
- To do this log onto my.ufl.edu.
- Click on the Main Menu.
- Choose My Self-Service.
- Choose Manage Class Rolls.
- Click on the appropriate class.
- Click on the envelope in the listserv column.
Set your Canvas Notifications and Update Profile
Help your students to connect with you by uploading a profile picture and adding a short bio. Encourage your TAs to do this as well. Share the things about your field that you find exciting and interesting. Chances are, your students will find them exciting too!
Canvas guides: How do I edit my profile in my user account?
Notification Settings
Make certain that you receive any messages that your students send you. Your teaching assistants should use the same settings. The settings below are suggested:
- Click on Account (in the menu to the left) > Notifications
- Announcement = ASAP
- Why? So that you’ll receive any replies to the announcement quickly.
- Announcement Created by You = ASAP
- Why? So that you’ll receive any replies to the announcement quickly.
- Late Grading = ASAP
- Submission Comment = ASAP (Important!)
- If you don’t set this, then you won’t know that students have left you a comment in response to an assignment submission.
- Discussion Post = ASAP
- You can just subscribe to the Course Questions or FAQ discussion forum if you prefer.
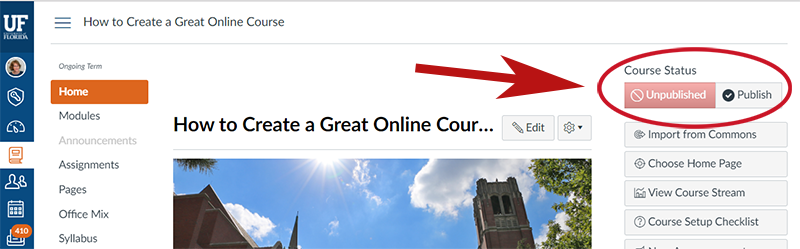
Publish the Course IMPORTANT! (8:00 a.m. term start or earlier)
The homepage of your course will show whether your course is unpublished or published. To publish the course, click the publish button in the top right corner of your window. You must publish the course so that students can log in to start class!
Note: It can help to get your course off on the right foot if you can publish your course a bit early. This will give students an opportunity to poke around before the start of classes. See the instructions below on how to make the course available before the first day of classes.
Change the Start and End Dates for a Canvas Course Site
In UF’s Canvas courses, the default dates are set so that once the course is published, it will open on the first day of the semester and close the Friday after grades are due. If you want to make your course available to students before the first day of classes, you will need to set the start and end dates.
To open the course before the first day of classes:
- Go to Settings in the left navigation.
- Next to Participation, choose Course from the drop-down menu.
- Set the day and time you wish the course to Start and End. (Be mindful of am and pm settings)
- If you’re going to change the start date, it’s a good idea to set an end date to avoid a technical glitch that may prevent students from taking a quiz.
- Remember that the course must still be Published in order for students to have access.
Full details on how to set student access dates can be found in the Canvas Guides.
