
OLD SECTIONS
33 iClicker Cloud
Micah Jenkins
![]()
iClicker Cloud is a student response system that is made available to UF students, instructional faculty, and staff at no cost by a Tech Fee innovation grant. With iClicker Cloud students can respond instantly to questions that you ask during class. Because it enables you to synchronously poll your online and in-person students, it is particularly well-suited for HyFlex teaching.
How Can I Learn to Use iClicker?
- Synchronous online workshops on how to use iClicker Cloud are available through the Center for Teaching Excellence.
- UF IT maintains self-help and training material for iClicker
Before Class
Getting Started
iClicker Cloud can be accessed via the instructor website, or you can download the desktop software. In order to use iClicker Cloud for synchronous sessions, you must have the software installed on the computer you use while teaching. If you are teaching from a HyFlex classroom, iClicker Cloud may have already been installed. To download iClicker cloud on your own:
- In your internet browser, navigate to https://www.iclicker.com/downloads/iclicker-cloud/ and select the correct download for your computer operating system.
- Next, click “Create Account” and enter your information. Under “Primary Institution” be sure to select “University of Florida.”
- After creating your account, you will be taken to the “Courses” window. Click “+ New Course.”
Managing your iClicker Cloud Course Settings
You can change your course settings on either the iClicker Cloud instructor website or in the desktop software.
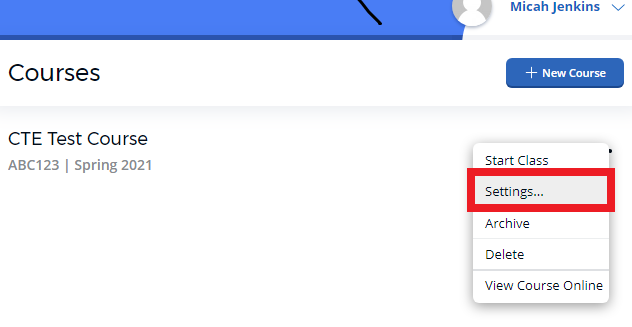
On the website, select your course, and then select “settings” from the left-hand menu.
When accessing your course settings in the desktop software, select your course, and then select “settings” from the course actions menu.
Your course settings are organized into six tabs:
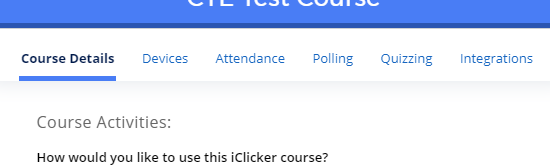
- Course Details – use this tab to edit your general information such as your course name, course term, and meeting dates and times. You can also use this tab to select whether you will use iClicker Cloud in your course just to take attendance, or to run polls and quizzes as well.
- Devices – this tab allows you to determine if students in your course will participate using only their mobile devices, only their iClicker remotes, or will be allowed to use both.
- Attendance – manage the options for your attendance preferences. You can also use the location feature to require students to be within a certain radius of your classroom to participate using iClicker. If you have students who are attending class remotely, make sure that the location feature is disabled.
- Polling – use this setting to adjust how you share images and class results to student devices after a poll. The value of poll participation and performance points can be adjusted here.
- Quizzing – select this tab to choose how many points students earn for correct quiz responses.
- Integrations – use the toggle in this tab to sync iClicker Cloud to the Canvas grade book.
Synchronizing iClicker Cloud to the Canvas Gradebook
You can sync student grades from iClicker Cloud to the Canvas gradebook. Before you can use this feature you must set up a Canvas-iClicker course link from inside Canvas. To do this:
- Log into Canvas and go to the course you want to sync.
- Choose “Settings” from the left navigation
- Select “Navigation” from the top menu
- Drag “iClicker Sync” from the list of tools at the bottom to the top list of items
- Click the “Save” button at the bottom of the page.
- Click the “iClicker Sync” option that is now in the left-hand navigation menu.
- When the app opens follow the prompts to login and click the “Link Course” button.
- Select the iClicker Cloud course you want to link to your current Canvas course and click “Next.”
- Select the Canvas course section(s) that should link to the iClicker Cloud course you selected in the previous step. Click “Save and Link Courses.”
After setting up the Canvas-iClicker link, you will need to set up your grade sync settings inside of iClicker Cloud. To do this:
- Navigate to your iClicker Cloud course, choose “settings” and select the “Integrations” tab.
- Toggle the “Grade Sync Integration” button to “on.”
- Choose “Canvas” as your platform.
- Select “Enhanced Grade Sync” and click “Next.”
- Click the “Verify the Integration Setup” button.
- Select how you would like your session scores to sync to Canvas, then click “Save” to complete the setup.
During Class
Run a Polling Session
Before you can run a poll, you must create an iClicker Cloud account and download the desktop software.
- Open iClicker Cloud on your desktop and log in.
- Hover over the course you want to poll and click “Start Class.” This opens the iClicker Cloud toolbar.
- Open the lecture content that contains your polling questions.
- Open Zoom, or your chosen video conferencing software and share your screen. The toolbar will remain floating on your screen.
- When you reach a polling question in your lecture click the checkmark in the iClicker toolbar to open polling options.
- Select your question type. There are 4 to choose from.
- Multiple choice
- Short Answer
- Numeric
- Target questions (sends an image to students, who answer by clicking a specific location on the image)
- Click the green start button to allow students to submit responses.
- To close a poll, click the red “stop” button in the toolbar.
- To share the results of a poll with the class, click the “results” tab
Run a Quizzing Session
iClicker Cloud allows you to give students low stakes assessments with the Quizzing feature. When quizzing students respond to multiple questions at their own pace using their iClicker account and personal device. In addition to quizzing, this feature can be used to:
- Answer questions during labs
- complete course evaluations
To run a quizzing session:
-
- Open the iCloud Clicker desktop software, find your course and click “Start Class.”
- Display your quiz questions.
- Click the “Quizzing” button in the toolbar. The “Quizzing Setup” will open in a new window.
- Enter the quiz name and allot the number of points per question and click “Start.”
- Click the “Start” button on the quizzing toolbar.
- Click the “Stop” button to end the quiz.
- To view and grade quiz results, click the “Results” button in the toolbar.
- Click “View Answers and Results.” The results will open in the panel beneath the quizzing toolbar.
- Indicate correct answers by clicking an answer choice in the results panel.
When you are done indicating correct answers click the “Results” icons in the toolbar. The results panel will close.
Taking Attendance
-
- Prior to the start of class, navigate to your course and select “settings.”
- Click “course details” and select if you are using iClicker cloud for polling, quizzing and attendance or attendance-only.
- Go to the”Attendance” tab and set your “Alerts”, “Auto-Run” and “Location” preferences.
- Click save and go back to the main screen for your course.
- When you are ready to take attendance, click “Start Attendance” in the lefthand navigation menu. The “Active Attendance Session” panel will open.
- If attendance for your course is set to “auto-run” the Active Attendance session panel will turn itself on and off based on the start and end times that you set.
- If your attendance isn’t set to auto-run, manually end your Attendance session by clicking “End Class.”
- To view attendance data click “Attendance” in the lefthand navigation menu.
FAQ
Where can I get help with iClicker Cloud?
Support
- iClicker Customer Support
- Judge Hensley, iClicker Client Relationship Specialist
- email: Judge.Hensley@Macmillan.com
- phone: 512-680-7989
Training and Workshops
- Synchronous online workshops on how to use iClicker Cloud are available through the Center for Teaching Excellence.
- Access On-Demand iClicker Cloud Training
- Schedule a one-on-one iClicker Cloud consultation with the UF Center for Teaching Excellence.
Guides
Faculty Training Resources – iClicker Cloud (PDF 181KB)
iClicker Cloud Mobile Instructor App User Guide
iClicker + Canvas Integration Guide
