Learning Activities
24 “Escape Box” Puzzles
Jennifer Smith and Micah Jenkins
What are “Escape Boxes?” | Puzzles | Equipment | Prototype | Production | Escape Box Activity
What are “Escape Boxes?”
 Modeled on the popular escape room puzzles, boxes containing puzzles and locked secrets can be an engaging way to combine teamwork and scavenger hunt activities. Stacey Curtis, Pharm.D. and Angelina Vascimini, a 4th-year student at the University of Florida College of Pharmacy presented this idea at the 2019 Interface Conference. This article describes the design, logistics, and tips for setting up your own escape box activity.
Escape puzzles can be used to:
- Hold students accountable for doing the reading.
- Practice analysis and problem-solving skills.
- Foster teamwork.
- Provide a fun break!
Considerations
Items to consider when planning your escape box:
- Time. It took about 80 hours of work to research ideas for ciphers, plan and create 6 clues for 5 boxes. (Use the ciphers described here to save some time!)
- Thought. Give yourself at least a week to think about clues that will support your learning goals (This isn’t as easy as you might think!)
- Boxes. Consider box size and storage availability as you will most likely want to re-use your boxes.
- Boxes/Pouches for Locked Secrets. With some crafty creativity, you can use inexpensive pencil pouches and boxes to contain your clues. These have the advantage of being space-efficient, and some have clear plastic windows for hints. (See the end of this chapter for details.)
- Locks. You’ll need small programmable locks. Inexpensive 3-digit locks can be found on Amazon.com. (NOTE: Unfortunately, these cannot be purchased through Amazon.com with a University of Florida purchasing card.)
- Quantity. Teams of 5 – 6 with 5 – 6 locked secrets work well. This makes it possible for each participant to work on a clue. Savvy teams will divide and conquer. You’ll need a box with your chosen number of secrets for each team.
- Iterate. We strongly recommend trying your puzzles out with a test group. Be prepared to make revisions. See the prototype tips at the end of this chapter.
- Digital. We used a mix of digital and physical clues. It is possible to create a fully online escape activity. Visit the next chapter to see how we did this. There are more suggestions on the Engaging and Effective Teaching Blog.
Planning
Determine the amount of time you would like participants to spend on the activity as this will dictate the difficulty level of the clues. Six Lower-level knowledge or scavenger hunt clues can be solved in approximately 20 minutes by a team of 5. Higher-level application or problem-solving clues will take more time. Keep in mind that the puzzles should be challenging, but not to the point of frustration.
Use post-it notes, a large piece of paper, or a digital diagramming tool to plan out how the players will get to the numerical code that will unlock the secret. You can provide more than one path, and you can include a clue to a different puzzle along with the secret.

Distractors
After you have planned out your puzzles, add a few items that will be distractors. These can be just about any object, booklet, or set of cards that looks like it might be something, but in reality, is not. Conference swag is ideal for this purpose. We found that we needed very few of these.
Puzzles
Use a variety of ciphers to encrypt clues or lock codes. It is a good idea to use icons or stickers to designate the clues, ciphers, and locked secrets that go together. Clearly mark the clues that will be found on the Internet. TheNounProject is a great place to get free icons that represent just about everything. (A low educational subscription price will save you time in citing the icon source.) Avoid relying on color alone to tie clues together as this could disadvantage colorblind players.
Booklet with Cutouts
A booklet or pamphlet can be combined with a piece of paper with holes cut in it to reveal a lock combination. You’ll need enough copies of the booklet so that you can include one in each box. Find a page that has enough numbers on it to provide a code. Pages with numbered lists work well.
Scan the identified page and print it out. Stack the printed page on a blank piece of paper and use a paper punch (if the holes are close enough to the edge) to make holes on the correct numbers. If the numbers are in the middle of the page, use an X-acto knife to cut the holes.
Crossword Puzzle

A crossword puzzle can be created pretty quickly using an online puzzle generator such as this Online Instant Puzzle Maker. These tools allow you to enter your own clues and answers.
In order to re-use the crosswords, we printed them on card stock, laminated them and provided fine point dry erase markers. Our players found the clues to be much more difficult than we had expected, so we had to revise them for a couple of iterations.
Disk Cipher
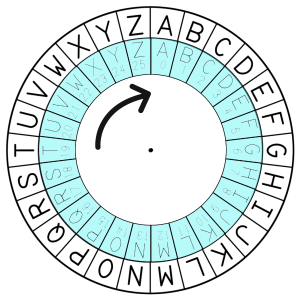
A disk or wheel decoder with letters and numbers can be used to provide a lock code. A Google search will provide many printable versions that you can choose from, such as this Secret Decoder Wheel from DabblesandBabbles.com.
Print the wheels out on card stock paper, cut them out, and fasten together in the center. It is a good idea to include an icon and color code to help the players match the wheel decoder to the correct puzzle.
Fill in the Blank
Fill in the blank questions are easy to use in escape boxes. You can re-purpose questions from old assignments by rewriting them as fill in the blank questions with very specific answers. Limit the possible responses by providing squares, one for each letter of the answer. Highlight certain squares to indicate that the content inside of it is a part of the unlock code.
Google Form
Use Google Forms to create a short answer or multiple choice question. Create a quiz using Google Forms. Provide the unlock code as the feedback players receive when they have answered the question correctly. For another twist, use a QR code to lead players to the Google Form.
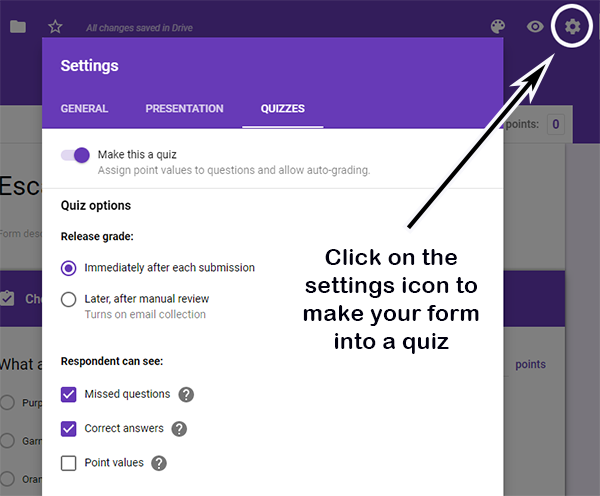
To set up your form, go to your Google Drive account and select “Create new” from the left menu. If you do not commonly use Google Forms, you’ll need to select “More” from the bottom of the menu.
- Choose “Settings” from the upper right menu
- Select “Quizzes”
- Move the slider that says “Make this a quiz”
- Choose “Release grade immediately after submission”
- Below “Respondents can see” check the boxes allowing them to see:
- Missed questions (let players know they got the question wrong)
- Correct answers (enter the unlock code here)
Invisible Ink
Purchase invisible ink pens and blacklight flashlights (available through Amazon.com). Write your message using the pen and include the flashlight in the escape box. If you want to make it more challenging, add words or images in regular ink to disguise the invisible message.
Pictographs or Rebus

Create a puzzle using pictures or icons (TheNounProject is a good source). Images from course content can help to reinforce concepts.
Process Cards
Write each of the steps that comprise a process on a card. Add the combination lock numbers to the bottoms of three of the cards so that they will reveal the code when placed in the correct order (example: nitrogen cycle).
Red Reveal
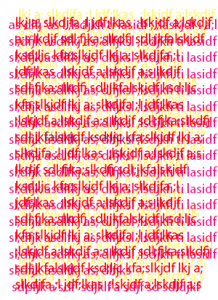
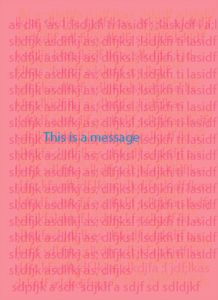
When you layer yellow, magenta, and red text on top of each other, you can hide a message written with cyan ink. When you place a piece of clear red plastic on top, it filters out the red and yellow so that you only see the cyan message. I adjusted the transparency of the layers of type in order to hide the message effectively. This took a bit of trial and error as I had to test print each version. A Photoshop file you can use to create your own message is available from Clean Energy Wiki.
Web Scavenger Hunt
Identify a web resource that contains numbers. Chapter or module numbers work well. Provide clues that guide players to the resource and then help them determine the correct code.
Scytale Cipher
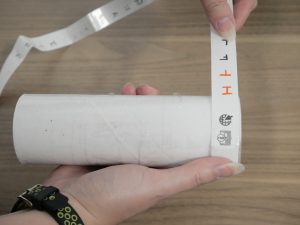
Buy a cylindrical mailing tube and cut it into smaller cylinders. We found that the cardboard tubes from toilet paper and paper towel rolls also worked well, but were not as sturdy. Wrap a long strip of paper around the tube and write the secret message horizontally across the strip along with other random symbols and letters. When the strip of paper is unwrapped, the symbols and letters on it should be nonsensical. When the strip is wrapped around the cylinder, the coded secret message will be revealed.
I found that participants had a difficult time wrapping the paper around the cylinder, and some participants wrapped the paper in the wrong direction. We remedied this by adding velcro tabs to the strip and the cylinder, along with an arrow to indicate the direction in which the strip should be wrapped.
Equipment
Pencil Pouches
In order to reduce cost and storage space, we used inexpensive pencil pouches ($1.35) and boxes ($.99) purchased from OfficeDepot.
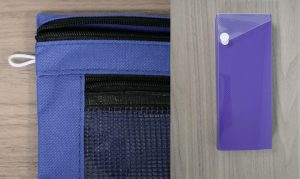
The pencil pouch zippers have a hole that allows a small luggage lock to go through it. A loop of nylon cord was pulled through the pouch seam with a crochet hook and hand-sewn into place (a stapler would also work). Each end of the cord was knotted, and the ends melted with a match or candle.
These inexpensive plastic pencil boxes have overlapping tabs. We drilled holes that lined up to allow a lock to be threaded through.
Big Box Lock
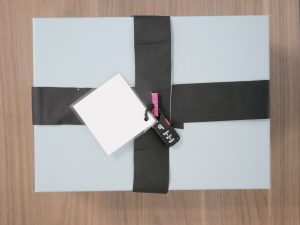
You’ll need to devise a way to lock the large box containing the smaller pouches, boxes, and clues. We laid pieces of duct tape on top of each other (sticky sides together) and then wrapped those around the box like a present. A piece of plastic (cut from a plastic folder) with a hole punched in it was layered between the duct tape on the lower strip. The plastic passed through the upper duct tape and then the lock went through the hole in the plastic. There’s probably a better way to do this. Please share if you figure something out!
Prototype
Once you have planned out your clues and ciphers, create a rough prototype. Don’t spend a lot of time making it “pretty.” As you put the clues together, keep in mind that players may not necessarily solve the clue in the most obvious way. For example, if you are using the tube wrap, they might wrap the paper strip in the wrong direction. You may need to provide a hint, such as an arrow to indicate the correct direction.
Ask colleagues, students, family members, or graduate assistants to be your testers for a test run. Time them and take notes as they go through the puzzles. DO NOT SKIP THIS STEP! We guarantee that you will find at least one thing that completely frustrates your testers. We conducted two rounds of testing before we used the boxes in a workshop.
Use the feedback from the prototype to revise your puzzles. Depending upon how much revision was necessary, you may want to do another test. If only minor revisions were necessary, you can go ahead and create the boxes. Even with the testing, our players found the clues to be much more difficult than we had expected.
Production
If you will be setting up more than 2 or 3 boxes, it is likely to be worthwhile to use digital tools to create clues that can be printed out. If your boxes will be used multiple times with the same clues, consider printing on card stock. If you have clues that participants will write on, such as fill in the blank or crossword puzzles, they can be laminated to support reuse. You’ll need to provide fine point dry erase markers to use with those clues.
Escape Box Activity
When it is time for the escape box activity, set a box on each table. Provide any rules orally, in a handout, or on a PowerPoint (or all three). Spice up the activity by providing prizes to the group that finishes first (determine how you will handle a tie). Once each group has a box and you have answered any questions, you can signal the start.
Keep track of the time so that you can make adjustments if the players take more or less time than you had planned. Float around the room and offer hints to groups if they get stuck on a clue. Make note of these sticking points so that you can either revise the box or the preparation assignments.
There you have it! An engaging and fun team activity that can support learning goals. Please share any new puzzle types that you create.

